
H ave you ever wanted to allow users to upload images to your blog? You're in the right place!
Letting users submit their own photos to your WordPress blog is a great addition to your blogging strategy. When you add this option to your site, you’ll get more traffic, engagement, and website contributors.
Plus, it’s easy to do!
In this guide, we’ll show you how to allow users to upload images to WordPress in a few simple steps.
Let’s get to it!
In This Guide:
Why Allow Users to Upload Images to the Front End of Your Site?
Allowing users to upload images on your site means you don’t have to do it yourself. So you’ll have extra time to work on other to-dos, like your blogging checklist.
But why would a user want to submit their own images?
There are a few reasons why someone would want to upload an image to your site. When you let users upload photos, they can:
Upload a Profile Picture
Your blog is full of anonymous users… unless you have a profile picture option!
A profile photo is a great way to strengthen your online community—users can identify others and express themselves.
Some websites that do well with profile photos are:
- Membership sites
- Submission sites
- Forums
Medium, for example, is a membership and submission blog. All members can submit their own articles through Medium. Plus, they can like and share other members’ posts.
At the bottom of every Medium article is the author’s name and profile picture:

So whenever Danny Forest submits an article, other Medium members can identify who he is and give him a follow. Sure, you can always talk with online users without a profile photo, but it’s nice to know who you’re interacting with.
Submit Images to a Gallery
You may have noticed how some websites allow users to upload images to a gallery. Imgur is a good example.

Imgur is an image sharing and hosting site. Online users can submit photos of all types to their site for comments, shares, and likes.
As you can tell, Imgur gets a ton of engagement and contributors. And even if you don’t own a site like Imgur, there are other types of blogs that would find a photo gallery useful, like:
Or you could run a photo giveaway campaign! For example, you could host a photo contest on your site, and whoever submits the best photo will win a prize.
Not to mention, it’s easy to create a user-submitted gallery on WordPress. You can check out our quick tutorial on how to create an image gallery on WordPress if you’re interested.
Personalize Testimonials
If you own an online store, then you know how important testimonials are. Written testimonials are great, but testimonials with images are even better! It makes it easy for potential buyers to visualize your product.
Let’s take a look at 100% Pure. This makeup brand lets users upload images along with their reviews.

So if a customer is happy with their lipstick, they can upload a photo of themselves wearing it. Take a look at this happy customer below:

See how her image is positive and shows off their lipstick? Another user might think… she looks great with this lipstick color, I want to try it out, too.
A testimonial with a photo also shows that your product works. When a new buyer sees your product in use, they’ll have an easier time trusting your business.
So whether you already sell products or want to start an online store, testimonials with photos can boost sales and build trust with your customers.
As you can see, allowing users to upload an image to your blog is a great way to:
- Jumpstart your membership site or submission blog
- Build an online community
- Give your product reviews a boost
So now you might be wondering, how do I allow users to upload images on my website?
Keep reading to find out!
How to Allow Users to Upload Images With a WordPress Plugin
The best way to let users upload images to the front end of your site is with an image upload form.
An image upload form is an online form that asks for the user’s name, email, and images to upload on your site. The easiest way to create one is with WPForms.

WPForms is a WordPress form builder plugin. Their drag-and-drop tool makes it easy to create any kind of online form, like:
- Image upload forms
- Survey forms
- Contact forms
- Newsletter forms
- Registration forms
- Payment forms
…and more!
So what else makes WPForms the best plugin to upload images?
For starters, they have an image upload form template which makes it even easier to let users upload images. And all of their forms are responsive—in other words, they look great on mobile and load fast.
Plus, WPForms is secure. You don’t have to give users any login information when they upload a photo. Everything they need is on the image upload form.
And best of all, you don’t need to know any code to use WPForms!
With all of these features, it’s no wonder why WPForms is the best WordPress forms plugin on the market.
Before getting started, you’ll have to download, install, and activate WPForms.
You can check out our guide on how to install a plugin if needed.
All set? Great, let’s get started!
1. Create an Image Upload Form
In this tutorial, we’re going to use WPForms’ file upload form template. So first we’ll activate their template pack to WordPress.
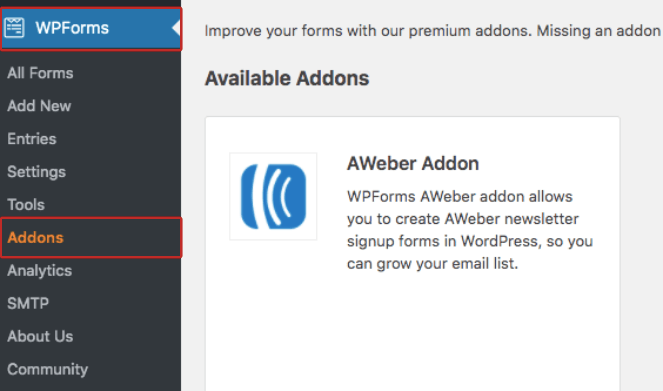
At your WordPress dashboard, head to WPForms » Addons.
On the Addons page, you should see a search bar at the top right—type in Form templates pack.
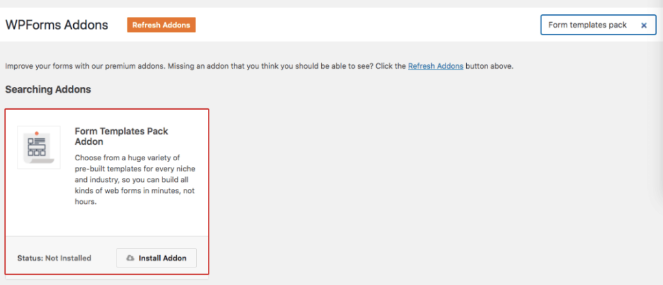
When you click Install Addon, it’ll change the template’s status to active.

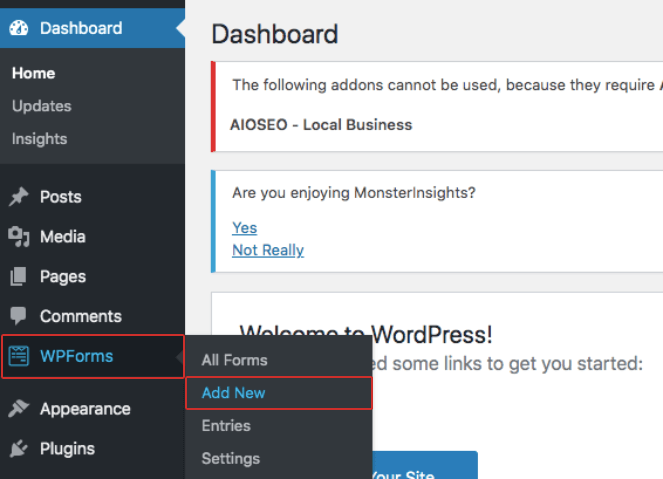
Now that the right template is activated, we can create your image upload form. Head to WPForms » Add New.
WPForms will direct you to their templates page.
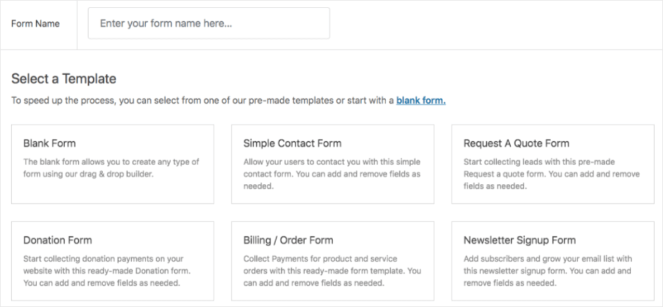
As their file upload form is part of the addon we activated earlier, you’ll have to scroll down to Additional Templates. Then you can search for File Upload Form.
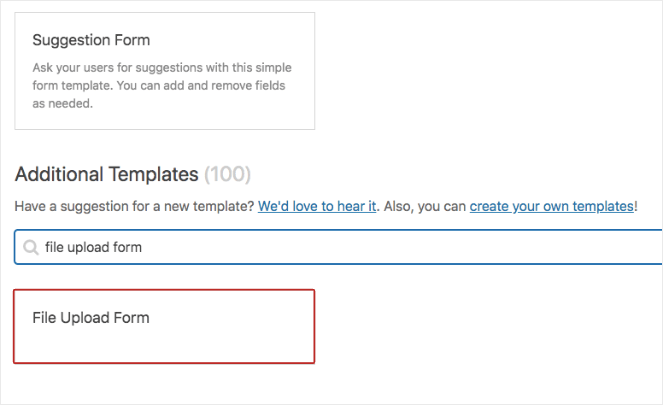
Now you can click on the File Upload Form to see your template.
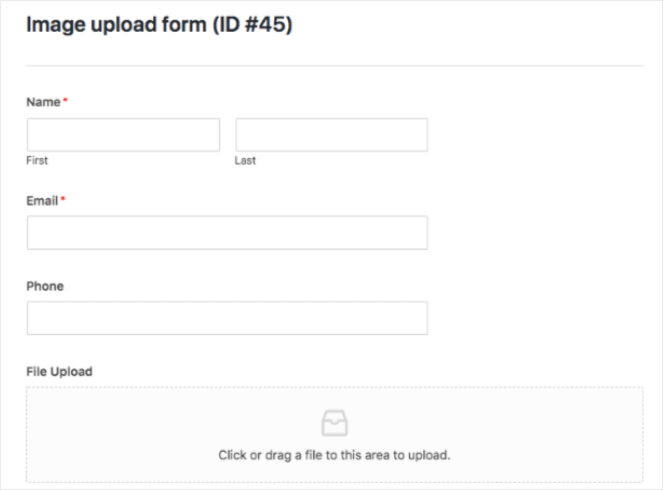
See how the form is ready to go? This is the best part about using their templates! Now, we can skip a bunch of steps and head straight to the customization settings.
2. Customize Your Image Upload Form
The first thing we’re going to do with your image upload form is customize it. To get started, click on the File Upload box.
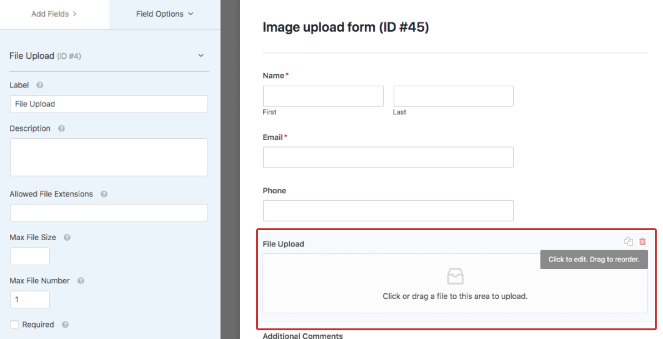
A list of field options should pop up on the left.
Go ahead and enter the name and describe what your form is about of your form under Label and Description.
If you’d like, you can fill out the rest of the fields. Here’s what they all mean:
Allowed File Extensions – Images have different file formats, like JPEG and PNG. So here you can decide which file formats your blog accepts.
If you’re not sure what each file format means, you can check out our post about optimizing images.
Max File Size – Not only do images have a file format, but they also have a file size. The file size depends on the image file format. For example, PNG images have a larger file size than JPEG images.
For good image SEO, we recommend filling out this option because large file sizes can slow down your blog.
Max File Number – In other words, how many images can a user upload at once?
Required – If you look at the file upload form, you’ll notice a red asterisk (*) attached to the name and email.

This means that a user has to enter their name and email in the form or else it won’t submit. So if you check the box next to Required, users will have to upload an image.
Once you’ve filled out these settings, hit Advanced Options at the bottom.
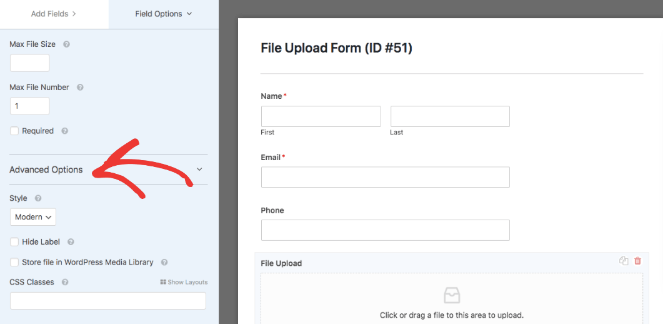
You don’t have to fill out the advanced options, but it’s nice to personalize your form. And it’s easy to do. With that, we’ll start with Style.
In style, you can either have a modern style or classic style. The classic style is simple—users can only upload one image file. And the drag and drop upload form will be replaced by a traditional file upload form.

The modern style, on the other hand, allows users to upload multiple photos. Plus, they can upload or drag photos to your form. We recommend using the modern style because of its user-friendly features.
Next is Hide Label. You’ll notice how the file upload box is named, File Upload.

When you check the box next to the hide label, this will be removed.
The next option, Store files in WordPress Media Library, means the form will automatically store every uploaded photo to your WordPress media library. This is a good option if you want to keep track of your uploaded images.
And CSS Classes is a setting for developers, so you can leave this one blank.
All done! Now we can head to your file form’s general settings.
3. Change the Image Upload Form General Settings
The settings we configured in the last step were all about your image file box. The general settings, on the other hand, are about your entire image upload form.
You can find the general Settings in the left-hand toolbar.
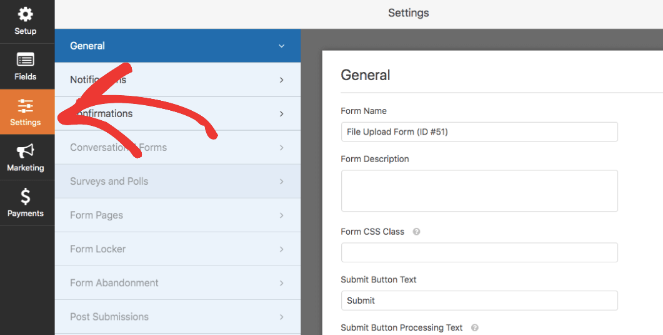
To start, go ahead and change your Form name and Form description.
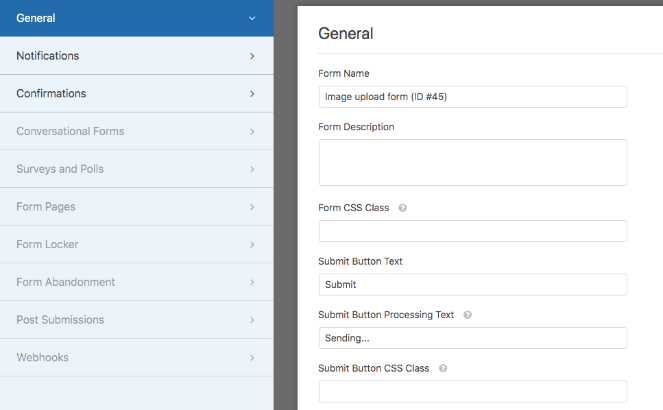
Next is Submit Button Text. If you don’t want your form button to say “Submit,” you can change it to something else, like:
- Launch
- Share
- Apply
- Send
- Get started
Now you might be wondering what Submit Button Processing Text is. If a user clicks on your submit button, another button will appear and say, “Sending.” This tells the user that their submission is processing.
If you don’t want your processing text to say “sending” then you can change it to something else, like “submitting,” or “sharing.”
And last are your spam settings.

You’ll notice how Enable anti-spam honeypot is automatically selected for you…but what does this mean?
Think back to the last time you filled out an online form. You were probably asked to confirm that you’re not a robot, right?

This reCAPTCHA setting avoids spam, but it’s not user-friendly. What if there was a way to avoid spam without a visible reCAPTCHA form?
With anti-spam honeypot, there is! Anti-spam honeypot adds an invisible anti-spam setting to your forms. This way, you won’t bother your site visitors with an extra task, and your file upload form will still avoid bots.
And your image file upload settings are ready to go…on to the confirmation page!
4. Personalize Your Confirmation Page
Your forms confirmation page tells website visitors when their images have been submitted. You can click on Confirmations to get started.
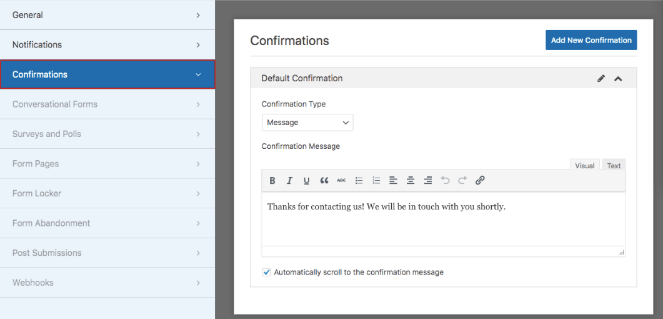
You’ll notice how WPForms set up a default confirmation message for you. If you want to change this, click on Confirmation type.
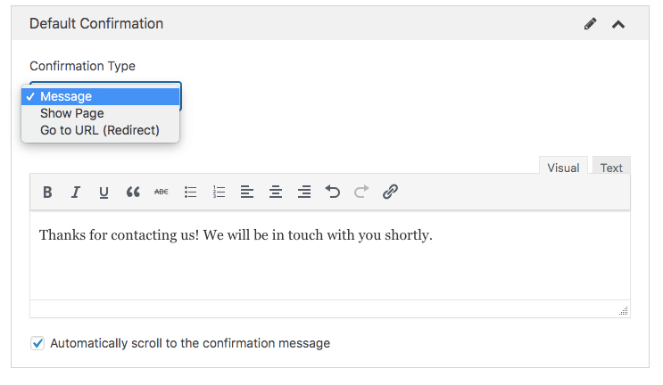
Let’s go over each confirmation type. The first one is Message, which will load a quick confirmation message when a user submits their images.
Show page, on the other hand, will direct users to another blog page. This is a great opportunity to promote a landing page or other blog posts.
And lastly, you can redirect users to a URL. This might be useful if you want to redirect users to another domain.
To keep it simple, we’ll use the message option in this tutorial. Let’s take a look at the message box.

Hmm…this confirmation message is good, but it’s nothing special. So why not add a call to action to spice things up?
For example, you could link users to your products page, content, or services. Take a look at our example below.
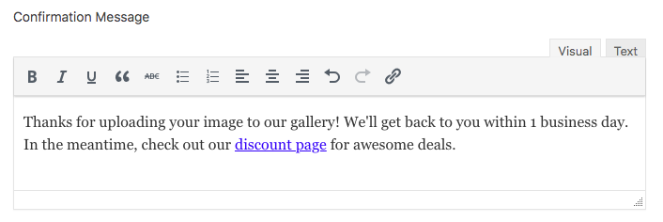
Once you’re done, hit Save at the top right corner. Then click the X to exit out of image upload form settings.

And you’re ready to publish!
5. Publish Your Image Upload Form to WordPress
Publishing your image upload form is easy. On your dashboard, click on Page » Add New.
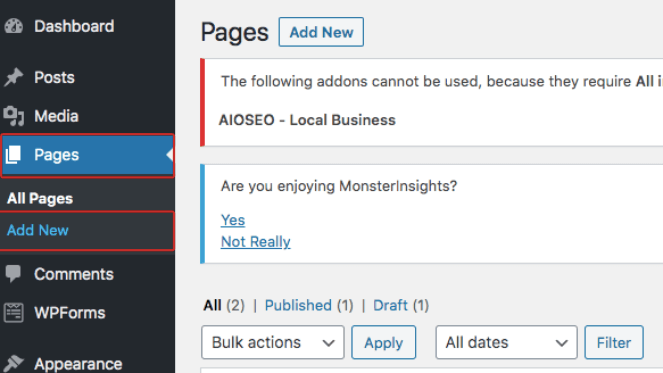
On your page, hit the (+) sign and then search for the widget, WPForms.

When you click on WPForms’ widget, a list of forms will appear. Go ahead and select your image upload form.
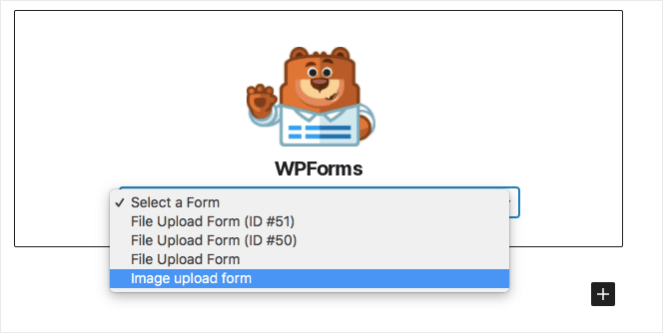
Now you can view your form on the page.
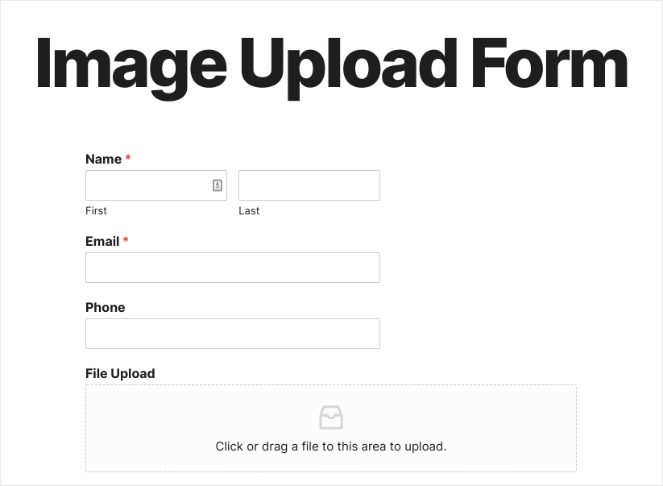
We recommend previewing your form before publishing it. You can find the Preview button at the top-right of your page.
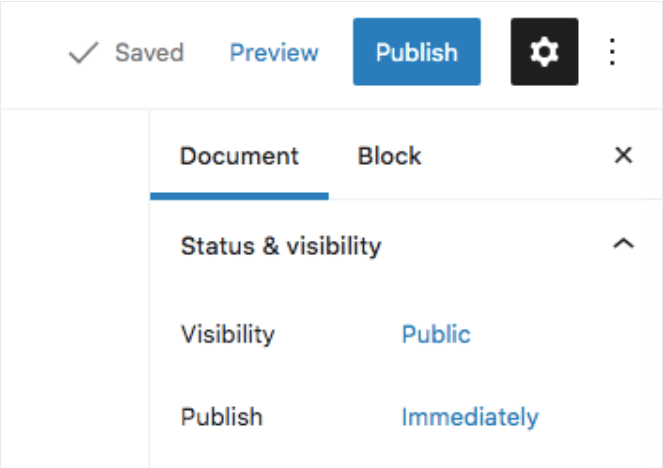
Looking good? Great! Now you can hit Publish, and you’re all done.
6. View Uploaded Images
Once website visitors begin filling out your form, you might want to moderate what images are being uploaded. Luckily, WPForms will store every uploaded image a visitor submits.
To view the files, head to WPForms » Entries.
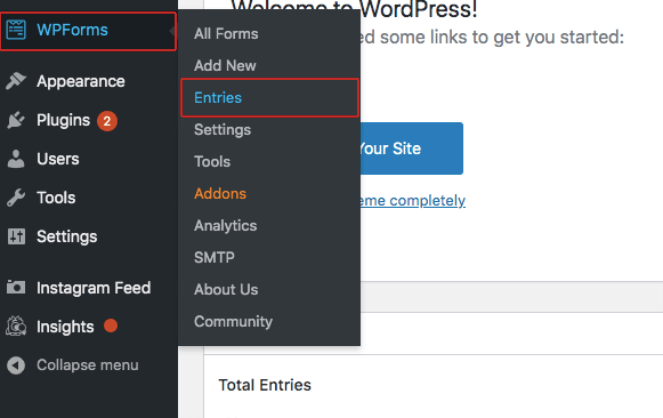
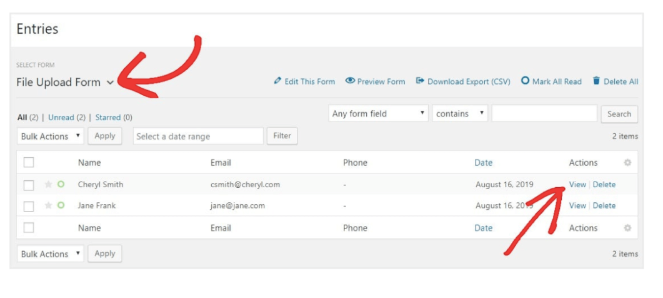
On the Entries page, scroll down to Form Names and click on your image upload form.

Now you can view a list of every user who filled out your form. If you want to see their photo, click on View.
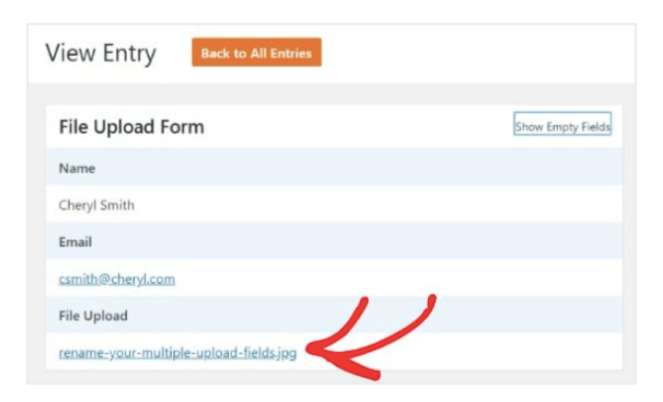
From here you can click on the image file to view or download it.
And that’s it!
Users can now upload images to your blog. Your website visitors will love this new feature. Plus, now you don’t have to upload all these images on your own!
Some other guides you might want to check out are, how to display an Instagram hashtag feed on WordPress and easy ways to engage readers on your blog.
And if you want even more helpful tips and tricks, subscribe to our newsletter!


Hi.
I am unable to see how USERS and READERS can see the images that they or someone else uploaded? Can the images be displayed in a gallery? Will that require another plugin?
Thanks.
Daniel.