
D o you want to learn how to start a food blog?
If so, you’re in good hands! In this short and sweet guide, we’ll break down step-by-step exactly how to start a food blog – and even how to turn it into a small business that makes you money!
Keep reading to get your blog up and running in no time.
In This Guide:
Key Takeaways For How To Start a Food Blog
Just in case you’re in a rush – we want to ensure you get a quick rundown of the most important steps involved in your journey!
- Before really diving in, choose a niche and name that resonates with your target audience.
- Browse the different popular food blog niches like recipe blogs, healthy eating blogs, and location-specific blogs to see which would best fit your interests and experience.
- Set up your blog with a unique domain name, reliable web hosting like Bluehost, and a customizable platform like WordPress.
- Avoid free blogging platforms to retain control and ownership of your content and assets.
- Choose a suitable customizable theme for your food blog, such as SeedProd that reflects your style and branding.
- Install necessary plugins like recipe plugins and SEO tools like AIOSEO to enhance your blog’s functionality.
- Create essential pages like an About Us Page and a Contact Us Page to engage with your audience.
- Get eyeballs to your content via SEO, social media, and email newsletters to grow your audience.
- Monetize your blog with display ads, affiliate marketing, and getting creative, like selling recipes.
Step 1: Choose a Food Blog Niche and Name
Before you dive into the nuts and bolts of your blog, like finding the best blog hosting, you’ve got to determine what you’re going to blog about.
If you want to start a food blog that’s both profitable and sustainable, you’ll need to do a bit of homework upfront.
We go into the details on how to choose a blog niche here, but to see if your idea is viable, sit down and brainstorm. If you can come up with at least 20 blog post ideas in 15 minutes, your topic has potential! If not, it’s back to the drawing board.
Types of Food Blogs
Another way to find a viable idea for your blog is to look at the types of food blogs out there.
For example, there are…
- recipe blogs
- food or drink tasting blogs
- cookbook review blogs
- healthy eating blogs
- cuisine-specific
- location-specific
- sustainable cuisine
- …and more.
You could use one of these ideas as a starting point and then drill down.
Once you’ve chosen your main topic, you’ll want to name your blog.
Think about your topic, your target audience, and what your blog style will be like.
To come up with a name, try…
- Entering your main topic into a blog name generator
- Using a thesaurus to come up with different words
- Use techniques like rhyming, alliteration, or assonance (like “Smitten Kitchen” or “Budget Bytes”)
- Putting your own spin on a common saying or idiom (like “Gimme Some Oven” or “Oh My Veggies”)
You can read more tips and examples in our guide on how to come up with a blog name.
Once you’ve settled on a topic and name, it’s time to roll up your sleeves and set up your blog!
Step 2: Set Up Your Food Blog
Setting up a new blog can be a bit overwhelming, especially if you’re not very technical, but we’ve got you covered.
Every blog needs three elements:
- A unique domain name: This is what people type into their web browser to find your blog. It’s usually the same as your blog name and should be easy to say and type. Learn more about choosing the best domain name here.
- A reliable web host: This is where all the files, images, and content are stored. Companies like Bluehost make it easy to set up your account and blog.
- A blogging platform: This is the software you use to write and publish your blogs, add the design and layout to your site, and more. We recommend WordPress, which as of 2024, powers around 43% of the web including big names like Adobe, Microsoft, Rolling Stone, and more. It’s easy to use, flexible, and offers a wide variety of customizations with themes and plugins.
Many aspiring food bloggers get stuck at this stage because they don’t want to pay for hosting, especially at the start. So they may look at a free blogging option instead.
We advise against using a free blogging platform and instead go with a paid hosting option.
Why? Because it’s critical that you retain control and ownership of all the contents and assets of your food blog. The free options may disappear after a while, leaving you without any copies of your content and a disappointed audience.
Plus, free blogging platforms are very limited in features. Many of them won’t let you use your own ads to earn money from your blog.
If you want more flexibility and control, you need to use a platform like WordPress and get your own web hosting.
We recommend Bluehost as a good starting option for new bloggers. You can get free domain name registration for a year and a discounted rate for being a Blog Tyrant reader.
Exclusive offer for BlogTyrant readers
We have partnered up with Bluehost to get 60% off for our readers! You also get to register a FREE domain for a year which normally costs around $14.99 per year.
Claim this Exclusive Bluehost offerOnce you’re on the Bluehost site, click on the Get Started Now button.

New bloggers can get started with the Basic plan, which include 1 site. You can always upgrade as your blog grows.
Then you’ll be asked to create a new domain.
Enter your chosen blog name and click Next. If it’s not available, you can use our domain name generator to get more ideas.
On the next screen, make sure to select the 36 months price if you want to get the best deal.

Once you’ve finished setting up your account, you’ll get an email with your login details. Once you’ve logged in, click on the the My Sites tab on the left.
Then click on Create Sites to get started with WordPress.
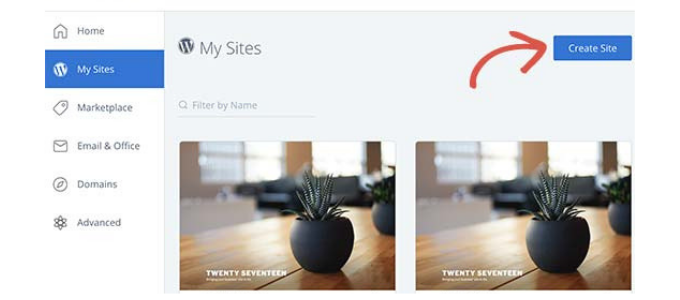
This will launch Bluehost’s free WordPress installation wizard, where you’ll be asked to enter your site name and a tagline. The tagline is optional, and you can always change it later if you want.
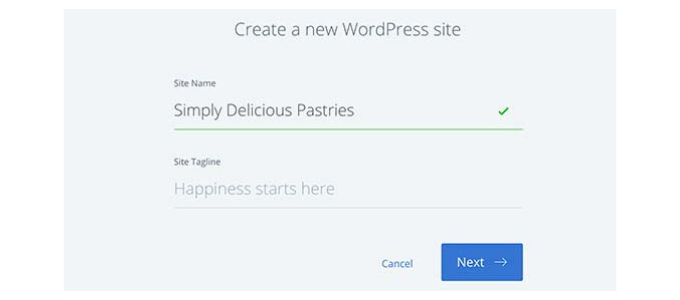
After you click on the Next button to continue, you can select your domain name from the drop down menu.
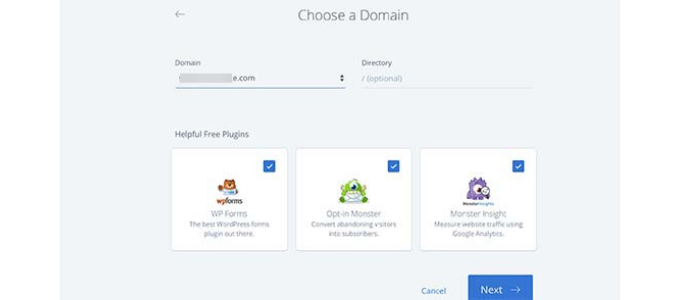
Then click on the Next button to continue. This will start the installation and it will take a few minutes to install. After it’s done, you’ll see the success message with your website’s details.
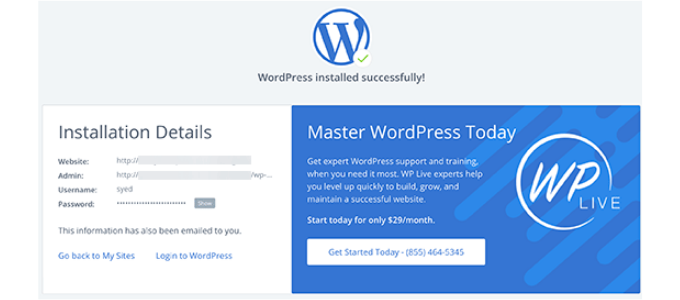
You’ll also get an email confirmation with a login link.
And that’s it, you successfully installed WordPress on Bluehost and launched your blog!
You’ll notice that your blog looks very basic right now. That’s because we haven’t installed a theme or plugins to make look better.
Once your domain is secured, your hosting is set up, and you’ve got WordPress installed, it’s time to choose a theme for your blog.
Choosing a Theme for Your Food Blog
WordPress blog themes control your website’s design and appearance. There are thousands of free and paid WordPress themes that you can install on your website.
However, not all of them are suitable for a food blog. You’ll need one suited to a food blog, and that matches your ideas on design and branding.
Here are a few options you can choose…
1. Get a Free Theme
One advantage of a popular platform like WordPress is the number of free themes out there. People have created thousands of them that you can use on your blog.
Here’s a roundup of popular themes for recipe and food blogs to get you started.
2. Pay for a Premium Theme
Premium themes are designed by experts. They are usually visually more appealing than the free ones, have more features and functions built into them. They also come with support, so you can get help if you need it.
We recommend using Divi or Astra, as they’ve both got great free starter themes and lots of customization options that work well for food blogs.
3. Create a New Theme
If you want a unique and original theme for your food blog, you need to pay for a custom-designed WordPress theme. This is an expensive option and can take months to complete. It’s a good future option for your successful food blog when it becomes a hit and you have thousands of dollars to spend on an original theme.
Or, you can create a custom WordPress theme with SeedProd, which is affordable and easy (no coding required).
No matter the theme you choose, you’ll want one that reflects the style you want to convey. That means thinking about whether you can upload your own logo, change the color palette, font choices, and whether you can change the blog post layout.
Installing Recipe and Food Blog Plugins
Your food blog will also need a recipe or food blog plugin to give you the ability to add recipes easily. These plugins have additional options where you can enter recipe details and have them published in a reader-friendly way.
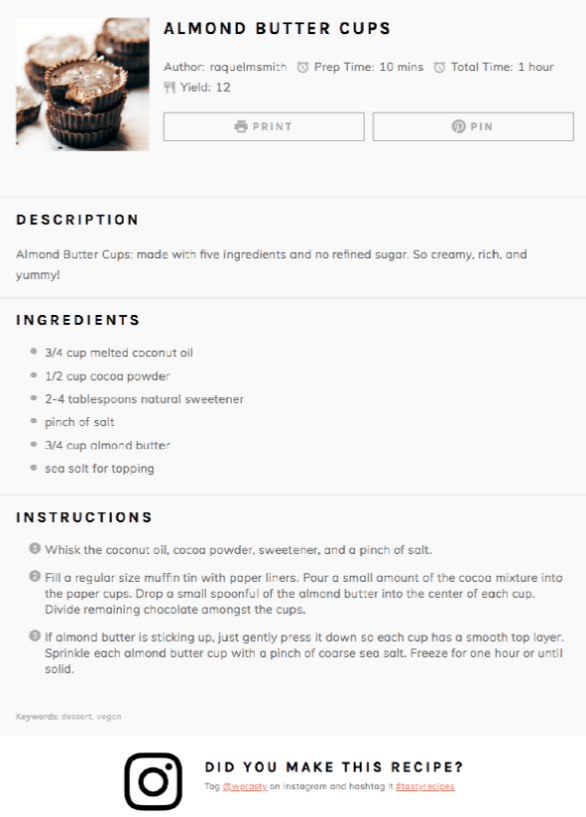
We recommend using WP Recipe Maker (start with the free option and then upgrade to the paid one if you want to use those premium features) and WP Tasty Recipes if you want to jump into a fully-featured premium plugin.
Aside from food and recipe plugins, there are other WordPress plugins that every blog needs to run effectively.
Here are a few:
- All in One SEO: Optimize your entire site for SEO to boost search engine rankings and drive more traffic to your blog.
- MonsterInsights: View your website stats from your WordPress dashboard. See where your traffic is coming from and who is visiting your site.
- WP Super Cache: Make your blog as fast as possible and improve the overall performance with this caching plugin.
- Sucuri: Protect your site from hackers and other vulnerabilities.
- UpdraftPlus: Create regular backups of your site so you don’t lose all of your hard work if something goes wrong.
Step 3: Create the Content and Start Blogging!
Now you’re ready to start creating and publishing your food blog content.
First up, it’s your core pages and main menu.
WordPress lets you create two different types of content: posts and pages. If you’re wondering what’s the difference, here’s a detailed guide on posts vs. pages in WordPress.
We recommend creating these pages for your new food blog:
- About Page
- Contact Page
To add a new page in WordPress, just log in to your WordPress dashboard and click on Pages » Add New.
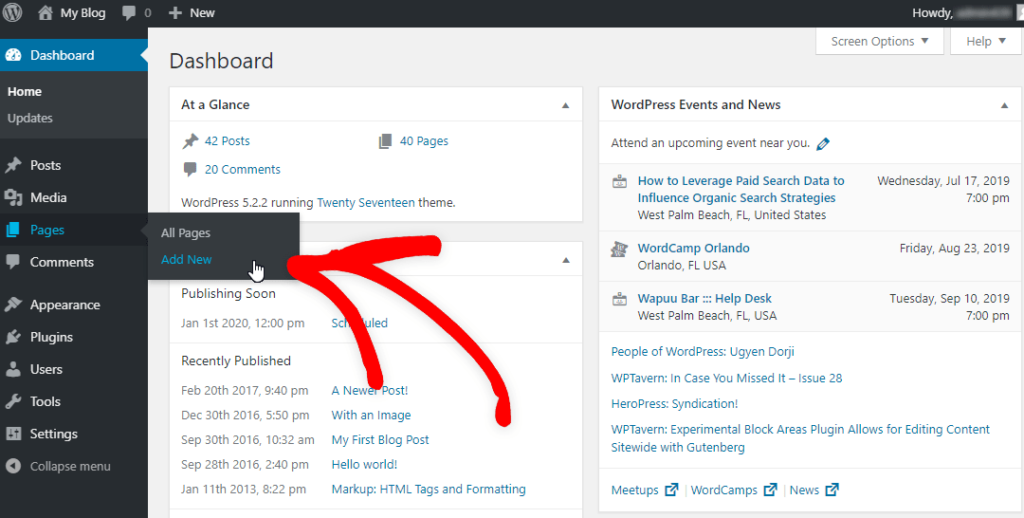
From here, you can add your page title and your content in the text editor. Check out these WordPress content editor tips for more details.
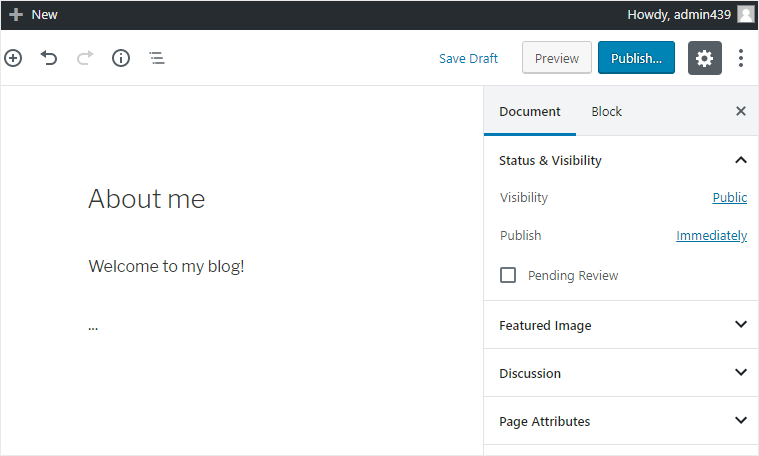
When you’re done, just click the Publish button and it will be live on your site.
Let’s take a look at how to create these pages and what they should include.
1. About Page
On your “About” page, you should introduce yourself to your readers and talk about what they can expect from your blog. Link out to your other social profiles so that your readers can stay in touch with you.
2. Contact Page
A contact page is essential if you want your readers to get in touch with you. You can create a contact form in less than 5 minutes with WPForms, which comes pre-installed on your Bluehost site.
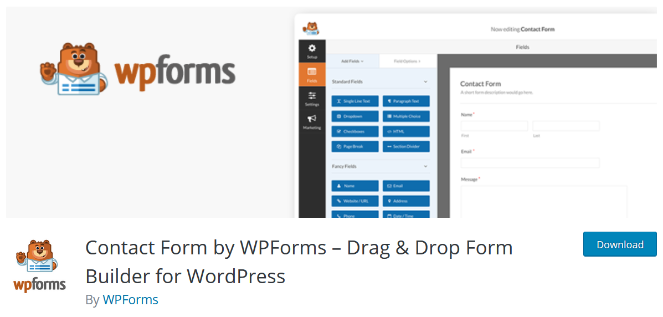
Here’s a tutorial on how to create a simple contact form.
The free version of WPForms is enough to get you started. But, if you want to create more powerful forms, you can upgrade to the Pro version.
The Pro version offers features like survey and poll addons, payment integrations, conditional logic, and more. You can even use the post submissions addon to allow readers to submit their own recipes to your blog.
And if you want to customize the layout and design of your pages, we recommend using a drag and drop page builder, our favorite is SeedProd.
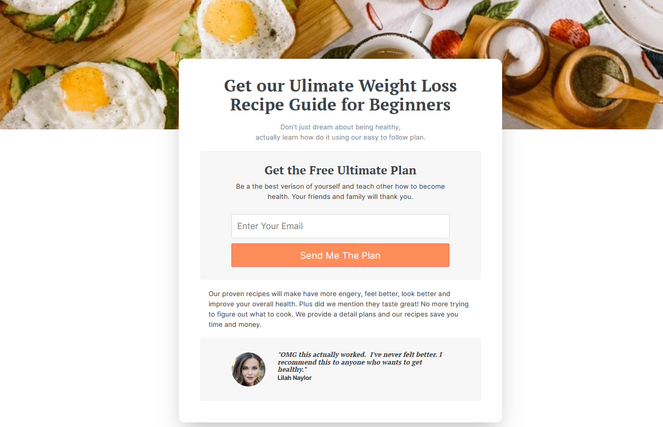
With SeedProd, you can easily create custom landing pages for your blog in minutes. It comes with ready-made blocks like countdown timers, testimonials, WooCommerce featured products, optin forms, and more. Just drag and drop the blocks to create a unique page.
Now that your pages have been created, it’s time to add them to the main menu of your new blog.
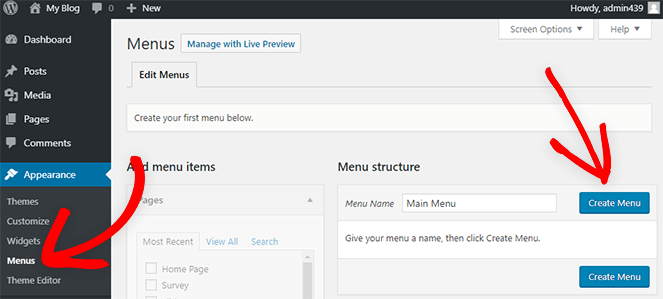
To create a menu in WordPress, click on Appearance » Menus. Enter a name for your menu (I just named mine “Main Menu”) and click Create Menu.
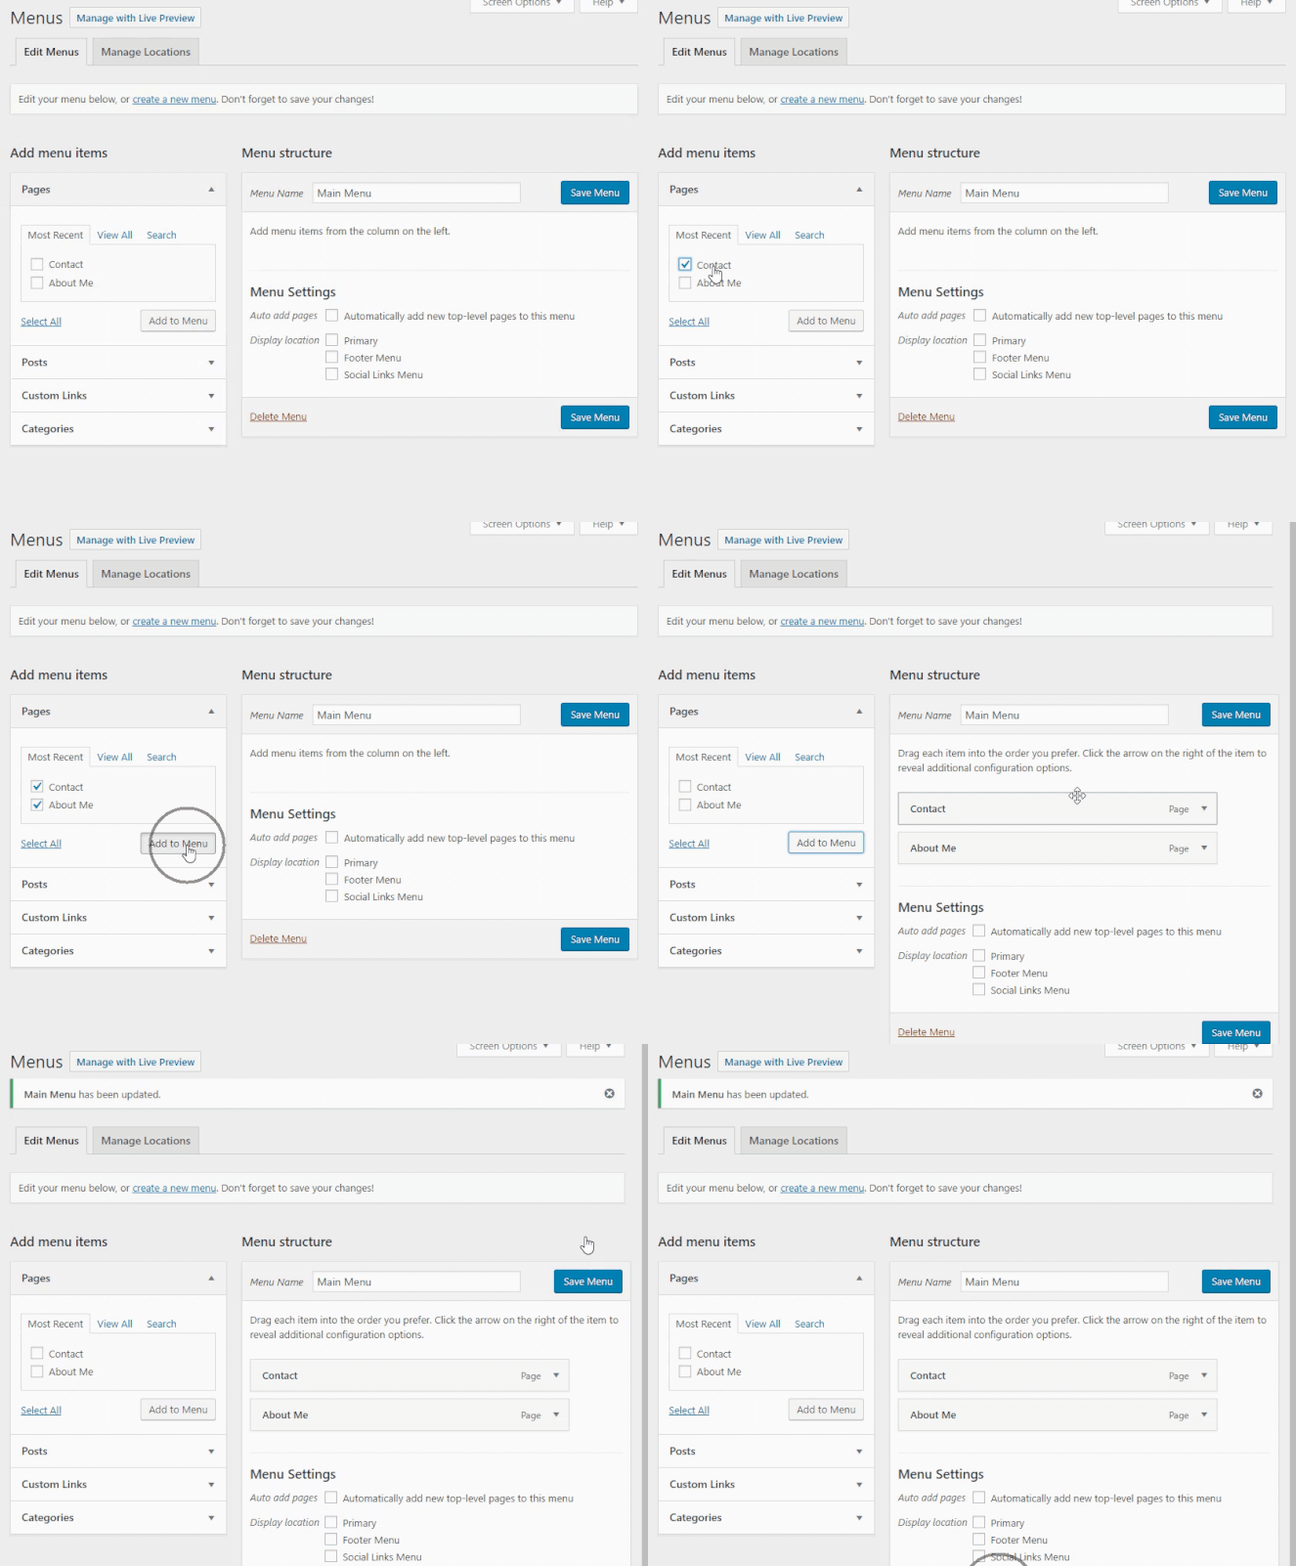
Now you can add your new pages to the menu. On the left side under Pages, check the box next to the pages you want to add to your menu. Then click Save Menu.
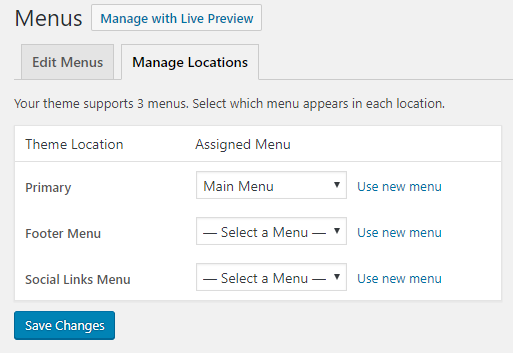
To add the menu to your header, click on Manage Locations tab at the top. Then select your menu in the location where you want it to appear. Note that your menu locations will be different depending on your theme, but usually there’s a primary, main, or header menu area for you to add your main menu.
Next, you’ll want to write your first set of blog posts. You already brainstormed some blog post ideas earlier, so pull those out and start writing.
If you get stuck, check out our ultimate list of blog post ideas, plus our guide on how to write the perfect blog post.
We won’t worry about monetization until a little later. For now, you just need to get some content on your blog, so it gets indexed by search engines, and you can start building an audience. You can also create a blog strategy to keep the ideas flowing and your cooking blog stocked with posts.
At this point, your food blog is up and running! Congrats!
But you’re not done. You’ll need to promote your blog to create and expand your audience. After all, you want to keep people coming to your blog regularly, right? And if you want to capitalize on the best ways to make money from your food blog, you’ll want to build a big healthy audience.
Step 4: Promote Your Blog and Grow Your Audience
There are a few ways you can promote your food blog. Some are passive, while others are more active.
Search Engines
Getting traffic from search engines and growing your food blog audience is the first step. With search engine optimization (SEO), you’ll take advantage of search engine algorithms to drive traffic to your food blog.
That means that whenever anyone searches Google for a topic you’ve covered, your blog will come up in the search results.
Social Media
Social media networking on Pinterest, Instagram, Facebook, and Twitter can be really huge for food blogs – especially if you have a lot of nice food photos or content that is easy to digest and share. They can help you build and grow your audience, as well as increase your blog monetization options since you’ll be getting more views to your content.
So, how do you start a blog on Instagram and other social platforms?
First, look at the biggest blogs in your food niche. See what social media platforms they use and what content they post.
For example, here’s the type of content that food blogger Dining with Chrissy shares on Instagram:
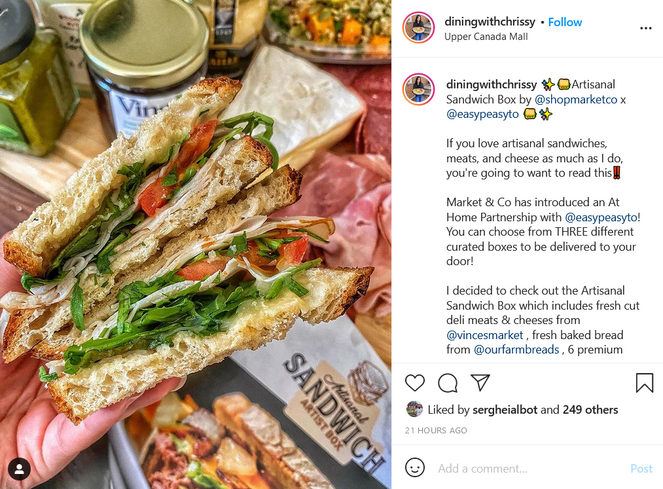
Then, dig deeper. Look beyond followers and likes, since those can be bought and faked. See how engaged their audience is, how much their content is shared, and what kind of interactions happen on the blog itself.
Then, start testing on your food blog. Pick one or two social media platforms and create content for them. Share your content on them and engage with your audience there. Ask people to follow you on those networks.
We recommend always engaging with commenters on your posts and adding one or two social media platforms to the mix.
We also recommend integrating your social media feed with your blog.
For example, you can easily add an Instagram feed to your blog using Smash Balloon.
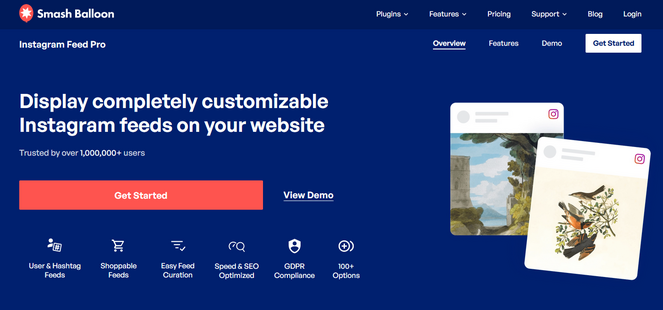
By displaying social feeds on your blog you can boost your followers, increase engagement, and provide extra, fresh content to your readers automatically.
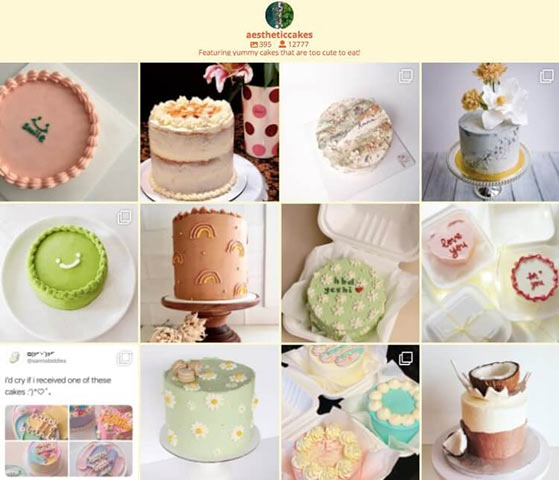
Smash Balloon also offers plugins for YouTube, Facebook, and Twitter feeds.
And if you’re on a budget, you can try out the lite versions for free.
Email Newsletter
Most professional bloggers use email newsletters to stay engaged with their audiences and generate an income from them. Email newsletters help you develop and sustain relationships with your audience better than any other marketing method you might use.

At least 99% of us check our email every day, with 58% of us checking it before even social media!
See our step-by-step checklist on how to do email marketing with your food blog and grow it like a total pro.
Step 5: Monetize Your Food Blog
Want to know how to start a food blog and make money?
As with other kinds of blogs, there are plenty of ways to monetize your food blog to earn an income.
Here are just a few ideas:
- Sell Recipes: To sell your recipes, bundle them into eBooks, and sell them directly on your site. You’ll need an eCommerce plugin like WooCommerce to add an online store to your food blog.
- Sell Branded Swag: Once you’ve got a good audience, you could start selling branded swag on your site. Use a print-on-demand service like Printful, Gooten, or TeeSpring to manage the printing and shipping for your t-shirts, mugs, jewelery, bags, and more.
- Display Ads: You can set up Google AdSense on your blog to display relevant ads on your site and earn money whenever someone clicks on the ad. This would be a perfect solution for a food review blog or restaurant review blog.
- Affiliate Marketing: Many food blogs offer product reviews and How-To posts, so why not add in some affiliate links to earn a commission off the products you write about? You can start with Amazon’s affiliate program, and then branch into other food-related ones as your audience grows.
If you’re curious about how much money you can make from food blogging, just check out this shortlist of successful food bloggers. These people will inspire you to learn how to become a food blogger and be good at it.
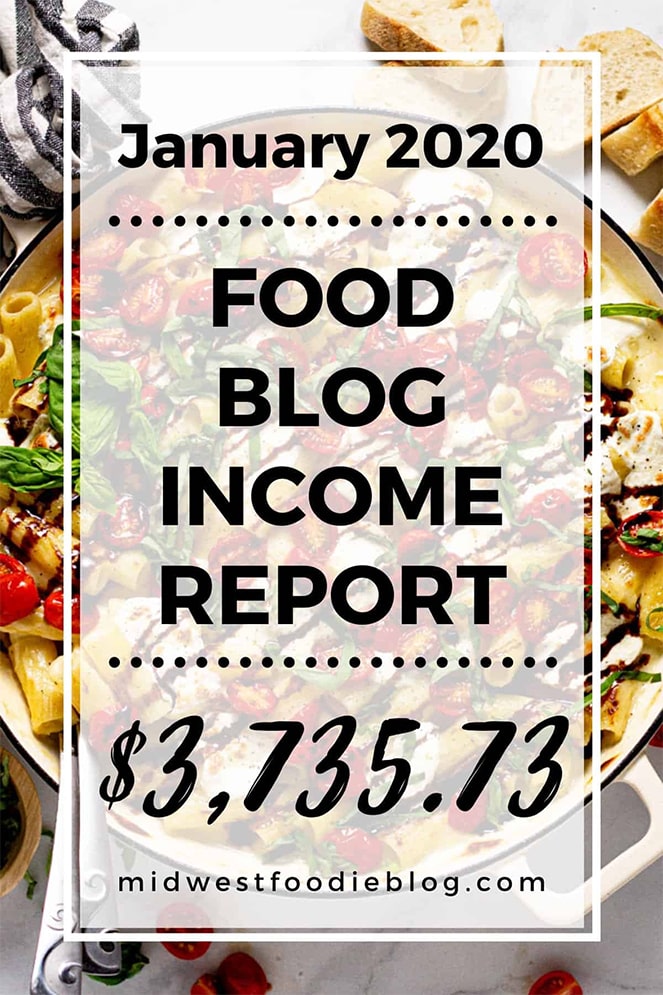
Midwest Foodie Blog makes money by displaying ads on her site and also selling sponsored posts.
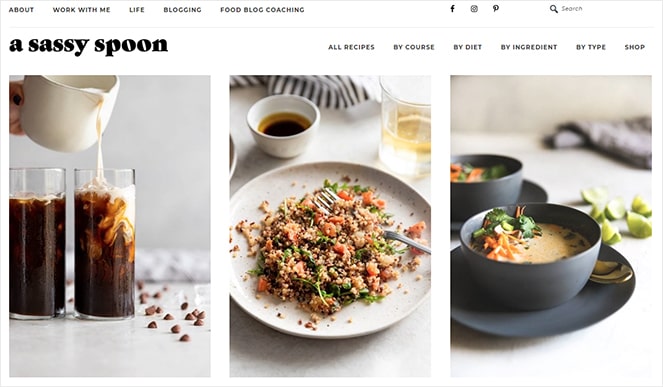
A Sassy Spoon made over $100K last year from a variety of different methods. They display ads, sell sponsored posts, and offer freelance services like photography and coaching.
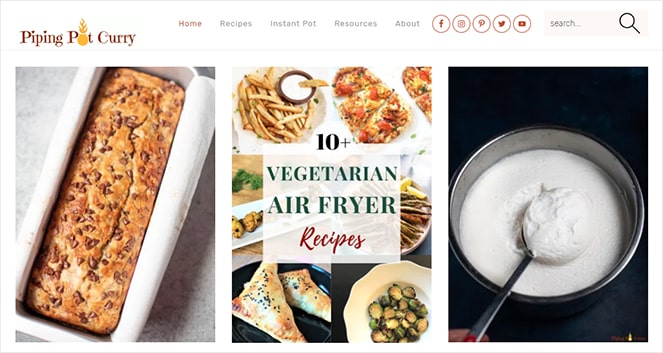
Piping Pot Curry also earns an income from ads and affiliate links.
For more ideas on how to monetize a food blog, check out our list of the most proven and profitable ways to earn money on your blog.
Start your Successful Food Blogging Journey Today!
There you have it, step-by-step instructions on how to start a food blog! You’ve gotten web hosting, chosen a WordPress theme, learned about recipe plugins, and started writing your first posts. You’ve even learned about some of the advanced steps to starting a food blog, so you can earn money from it.
Take a look at our article on food blog examples for more inspiration.
Have you started a food blog? Let us know in the comments so we can take a look. We’d love to see what you’re writing about and hearing more about your experience.
Now that you know how to start a food blog, check out our article on how to get traffic to your blog next.
And be sure to sign up for our email newsletter for more helpful blogging tutorials like this one!


Thanks Ramsay! I normally dont leabe combents but im teally thrilked with this one. I’m glad I checked your article first….it has just everything I was looking for to start rolling.
I can’t wait to start giving feedback.
Cheers!
Keep up the good work.
Very informative, I liked…….
Your tips on food blog creation are quite illustrative. I believe people will benefit from your write-up. In fact, I am tempted to build a food blog of my own.
Your tips on food blog creation are quite amazing.
Amazing! I have recently started my food blog & this is really helpful . Thanks for the post;)
Nice! Now, I will try this in 22
Thanks for sharing! Excited to be grilling again! Looking forward to learning more.
This is a very informative & interesting article. Nice to read your blog post first time ever. I really appreciate this post. Thanks for sharing this awesome post.
Such awesome tips and information about various types of food blogs. This was truly helpful. Really appreciated.
amazing post. thanks for sharing with us.
After reading your blog I started to wright my blog and it was successful.
Hi
I love this list! I’ve also just started a food blog with very simple but showstopping home cooking recipes – check it out and let me know your thoughts!