
A re you wondering how to create rich snippets? In this tutorial, we’ll show you how to add rich snippets in WordPress so that you can land rich search results for your blog posts.
When you start a blog, getting your blog posts to rank in Google is one of the best ways to get more traffic. And getting eye-catching rich snippets is even better!
That’s because rich snippets are special, highlighted Google search results that get more clicks than plain search results.
So, how can you get Google rich snippets?
In this article, we’ll show you how to add rich snippets in WordPress, step-by-step.
Let’s begin!
In This Guide:
But first, let’s go into more detail about what rich snippets are and why they’re so important…
What are Rich Snippets?
Rich snippets, also known as rich results, are Google search results that display additional information like star ratings, prices, images, and more.
To get a better idea, let’s take a look at some rich snippet examples.
Here, the food blog Cookie and Kate has a rich snippet for her blog post that includes an image, star rating, reviews, and other information:

Compare that to a regular search result for a similar recipe blog post below:

As you can see, the rich result is much more visually appealing and provides helpful information that users are looking for.
Here’s another example of a rich snippet, this one is for a product and includes an image, price, ratings, reviews, and more.

With this additional information, online shoppers can quickly see if this is the type of product they’re looking for and click over to buy it.
Aside from recipes and products, there are many other types of rich snippets including:
- Review snippets
- Event snippets
- FAQ snippets
- Business information snippets
- Music snippets
- And more
So, why are rich snippets important?
Because rich snippets stand out more in search results and provide extra information that users are looking for, these search results are likely to get more clicks.
This will help you boost your search engine rankings, attract the right audience, and drive more targeted traffic to your blog that you can turn into email subscribers or customers.
For more tips, check out our guide on how to drive traffic to your blog.
Now that you know how rich snippets can benefit your blog, let’s look at how to add them in WordPress…
How to Make Rich Snippets in WordPress
In order to create Google rich snippets, you need to add schema markup to your web pages.
Adding schema markup code to your website can be tricky though, especially for beginners. Coding is too complicated for many bloggers. Plus, it takes a long time, and if you mess up, it can cause problems and you’ll have to start all over again.
Luckily, you can use a plugin like All in One SEO (AIOSEO) to make it easy.

AIOSEO is one of the most powerful and beginner-friendly SEO plugins for WordPress. With this plugin, you can add rich snippets schema markup to your site in minutes, and you don’t have to touch a line of code.
You can add schema markup to articles, products, reviews, recipes, courses, and more. There’s also a Local SEO Schema feature that can help your business appear in local search and Google Maps.
Not only that, but AIOSEO offers a ton of other amazing features to help you improve your blog’s SEO, including:
- SEO Audit Checklist
- TruSEO On-Page Analysis
- Smart XML Sitemaps
- Social Media Integration
- WooCommerce SEO
- And much more…
For more information, take a look at our detailed All in One SEO review.
Now that you have the right tool for creating rich snippets, let’s dive into the tutorial.
Step 1: Download and Install the AIOSEO Plugin
To get started adding the rich snippets, you’ll first need to download and install the All in One SEO plugin.
Head to AIOSEO’s official website and click on the Get All in One SEO for WordPress button.

After that, you can choose your pricing plan and follow the checkout process to complete the purchase.
On a budget? You can also get started with the free version of AIOSEO.
Next, you need to install and activate the AIOSEO plugin on your WordPress site.
If you haven’t installed a plugin before, check out our guide on how to install a WordPress plugin for step-by-step instructions.
Once the plugin is installed and activated, go to All in One SEO » General Settings from your WordPress admin panel. Here you can activate your license key (which you can find in your AIOSEO account) if you’re using the pro version of AIOSEO.
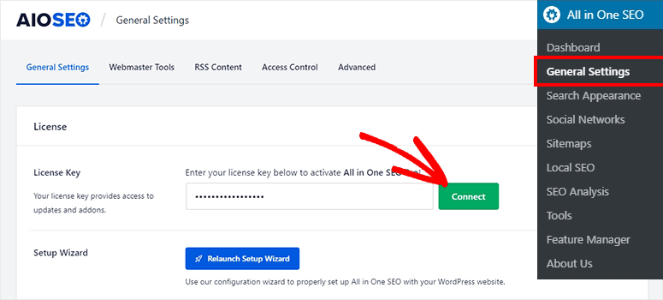
Click Connect to activate your license key.
Next, we’ll show you how to set up the main schema markup settings, starting with your site’s search appearance.
Step 2: Configure Your Search Appearance
To tell Google about your website, go to the All in One SEO » Search Appearance » Global Settings page.
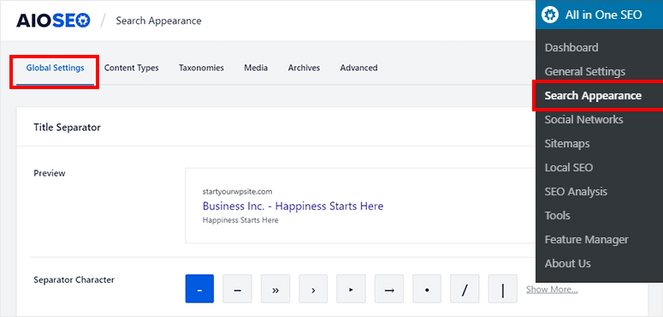
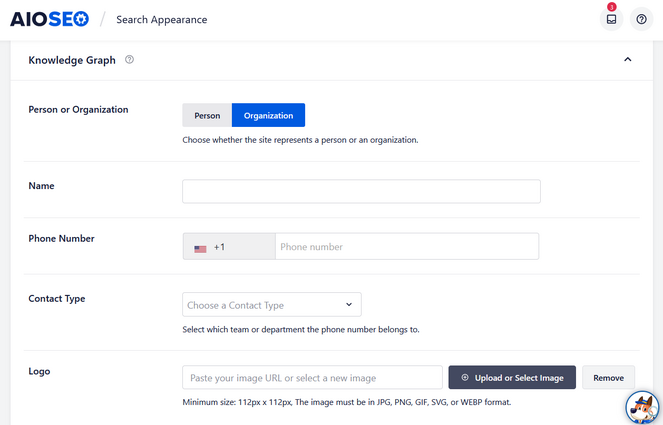
Scroll down to the Knowledge Graph section. Here you can choose whether your website represents a person or an organization.
If you select the Organization option, add your name, phone number, contact type, and logo.
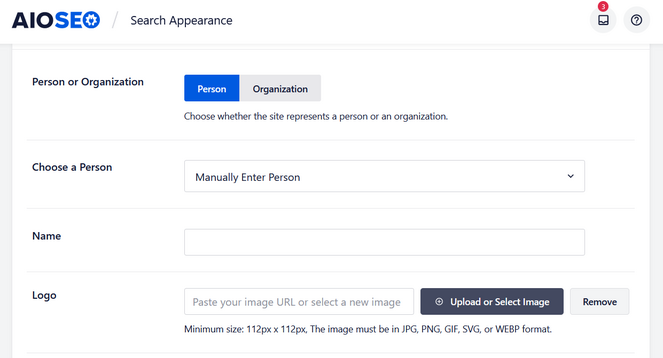
If you have a personal site, all you need to add is your name and logo.
After you’re finished filling in the details, click the Save Changes button to store your settings.
Next, we’ll show you how to enable the sitelinks search box.
Step 3: Enable Sitelinks Search Box
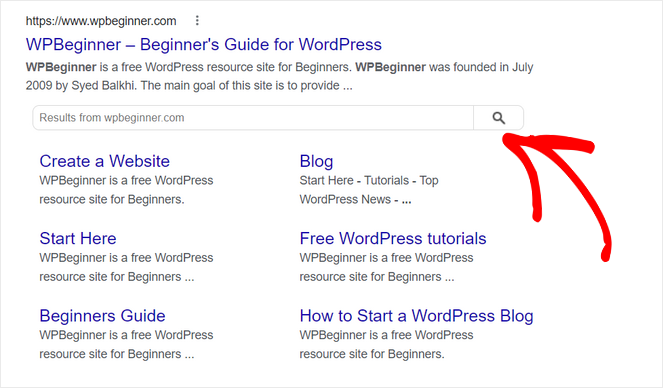
A sitelinks search box is a quick and easy way for people to search your site directly from the Google search results.
Here’s an example of a sitelinks search box for WPBeginner:
To enable this setting, go to the All in One SEO » Search Appearance page and click on the Advanced tab.
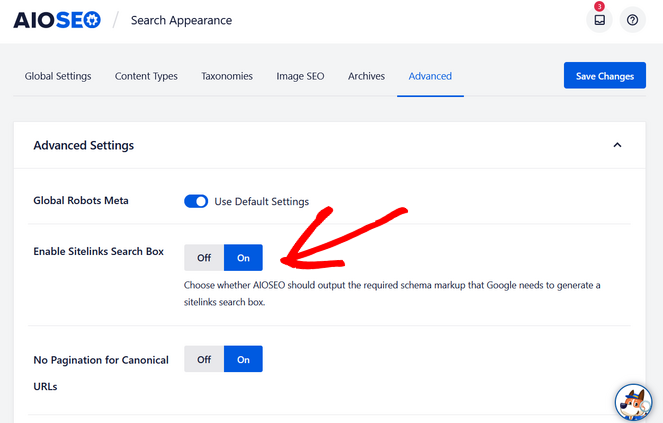
This setting is enabled by default so all you need to do is check that the toggle is set to On in the Enable Sitelinks Search Box.
Then, AIOSEO will automatically send the code so that Google can display the sitelinks search box in the search results.
If for some reason you don’t want this feature, you can switch the button to Off.
That’s it for the main schema markup settings. Now, we’ll show you how to add rich snippets to your content.
Step 4: Add Rich Snippets to Your Content
First, go to the All in One SEO » Search Appearance page and then click on the Content Types tab.
On this page, there will be sections for each type of content on your site including posts, pages, and products. In the Posts section, click on the Schema Markup tab. Now you can set your Schema Type and Article Type.
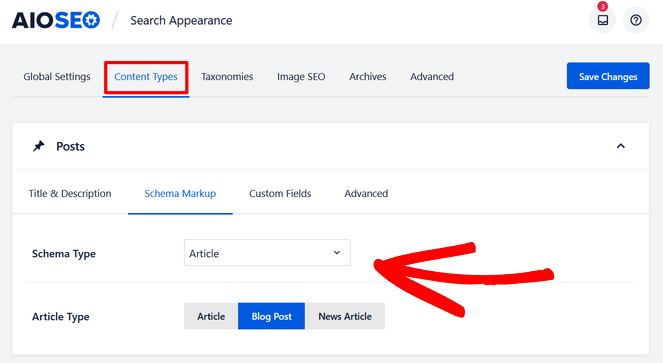
If you have a blog, make sure that you choose Article as your Schema Type, it’s the best option for blog posts and news articles.
For the Article Type, you can choose the Article, Blog Post, or News Article option, whichever fits your content the best.
Repeat this same process for the Pages and Products sections.
Don’t forget to hit the Save Changes button before moving on to the next step.
Step 5: Add Rich Snippets to Your Posts and Pages
You also have the option of adding rich snippets or schema markup directly in the WordPress editor for your individual blog posts and pages.
To do this, scroll down to the AIOSEO Settings at the bottom of your post or page. Then, click on the Schema tab.
Next, click on the ‘Generate Schema’ button.

This will open up the Schema Catalog where you can choose from options such as Article, Recipe, Product, Course, Software Application, Web Page, and more.
Simply click the ‘Add Schema (+)’ button next to the type of schema you want to add.
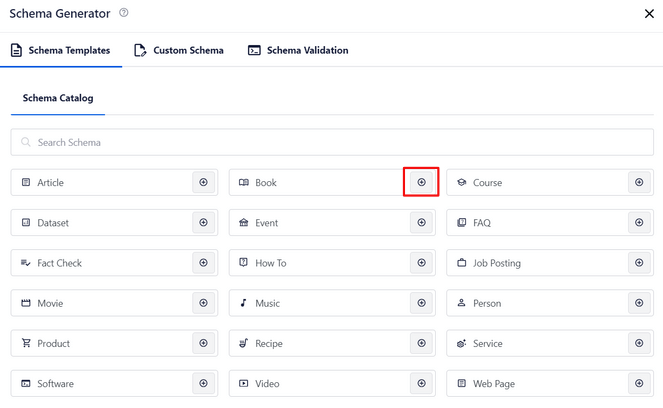
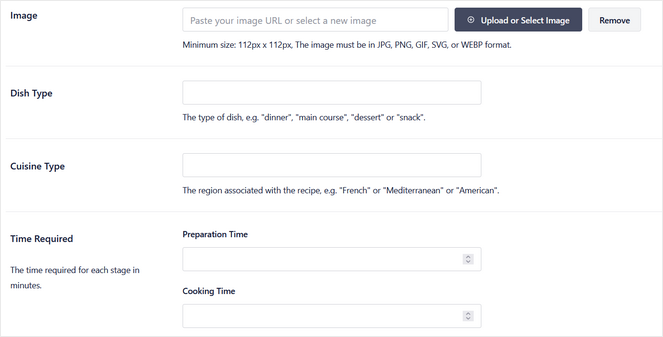
Depending on the schema yype you choose, you’ll see different fields where you can enter additional information.
For example, if you choose the Recipe schema type, you can add details like the dish type, cuisine type, time required, calories, ingredients, and more.
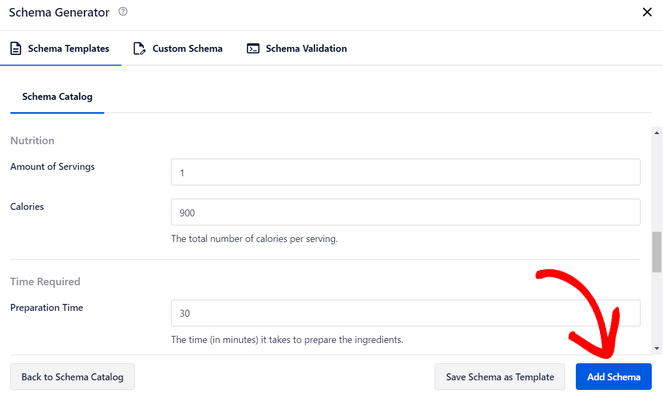
When you’re done, click the ‘Add Schema’ button. Don’t forget to update your post or page to save the changes you made to the schema settings.
Step 6: Add Rich Snippets to Your Products
If you have an online store, you’ll definitely want to add rich snippets to your products so you can get rich search results with prices, star ratings, reviews, and more.
Luckily, All in One SEO’s Product Schema seamlessly integrates with WooCommerce and other eCommerce plugins like Easy Digital Downloads.
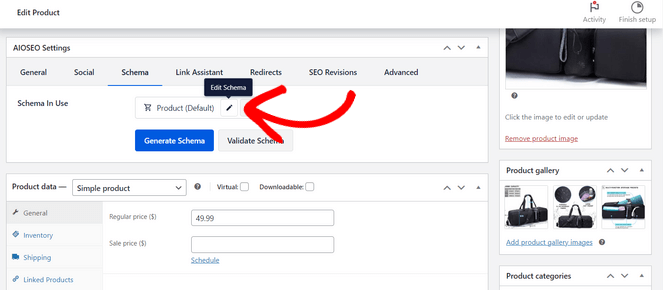
To add product schema markup, simply edit one of your products and scroll down to the AIOSEO Settings section at the bottom. Then, click on the Schema tab.
Now, next to Schema in Use, click on the ‘Edit Schema’ button.
By default, All in One SEO automatically generates the rich snippets schema based on the product data from WooCommerce.
However, you can disable the Autogenerate Fields option by flipping the switch to the ‘No’ position.
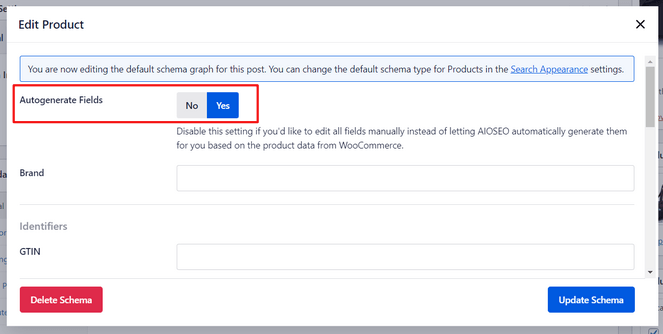
This allows you to manually add additional details about the product such as the brand, material, color, size, pattern, and so on.
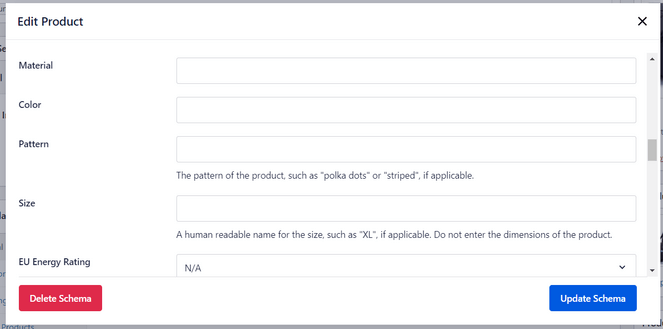
You can also add product reviews and star ratings so that your rich search results will display social proof, which can help you boost sales even more.
Scroll down and use the Reviews form to add any reviews that customers have left for your product. You can type or paste in the headline, content (review), author (reviewer’s name), and star rating.
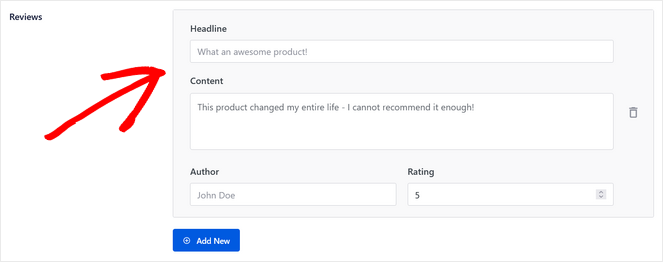
Use the Add New button and repeat the process to add more reviews.
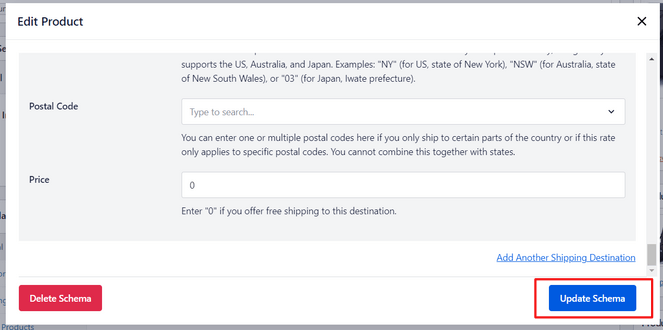
When you’re finished, click the ‘Update Schema’ button. Don’t forget to update the product in WooCommerce to save your settings.
That’s a wrap!
After reading this tutorial, you know how to easily add rich snippets in WordPress with All in One SEO.
Now, with your site optimized for rich snippets, you can improve your SEO, drive more traffic to your site, and increase sales with eye-catching rich search results.
If you liked this article, then you might want to check out our post on image SEO. It includes simple steps to help you unlock even more traffic.
Also, don’t forget to subscribe to our newsletter to get blogging tips delivered straight to your inbox!


Very nice article.
I liked it. Very simply explained.
thank you
That was so informative and insightful.
Great blog! Thanks for this. I learn a lot. Keep it up!
Thanks Liam!