
D o you want to learn how to start a travel blog and make money?
Most people want to travel, but what’s holding them back is the fear of the unknown. How much will it cost? Where should I stay? What should I pack in my suitcase?
If you’re a frequent traveler and you love exploring new places, you can start a blog to share your travel tips and experiences with others—and make money doing it.
But how?
In this guide, I’ll teach you step-by-step how to start your own travel blog and make money online.
So, fasten your seat belts; we’re going for a ride.
In This Guide:
Choose Your Travel Blog Niche
Let’s face it: traveling is a tough niche to compete in, and if you want to be a successful travel blogger, you need to stand out from the crowd.
If you’re thinking about starting a travel blog, you need to ask yourself: Who will read my blog? If you are looking to run a typical run-of-the-mill travel blog, the answer is “no one.”
To get started, you need to make a plan. You need to identify the exact audience you’re writing for and your specific travel blog niche within the world of travel blogging.
Look at these travel blog examples. This travel blog is called Lost with Purpose.
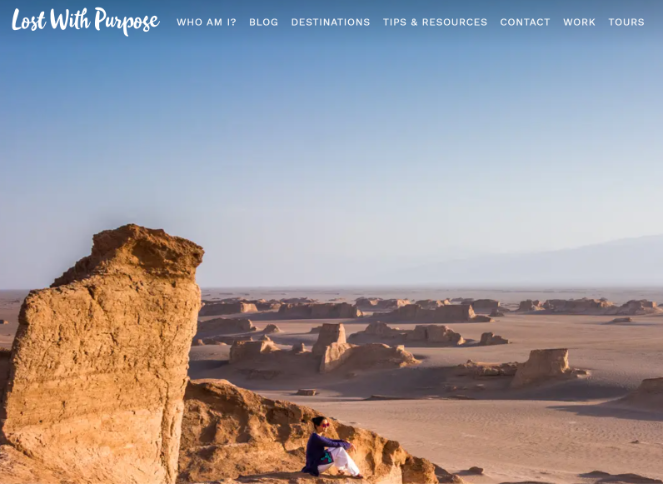
It’s run by Alex Reynolds, she is a solo female traveler who encourages women around the world to travel solo.
If solo female travel is not your thing, you can choose an adventure travel niche like Eva Zu Beck.

She is Canadian and promotes adventure travel on this successful travel blog, which requires people to stay outdoors and explore the wilderness.
Or you could mix it up like Nomadic Matt; he is an adventurer who teaches you how to travel the world on a budget.
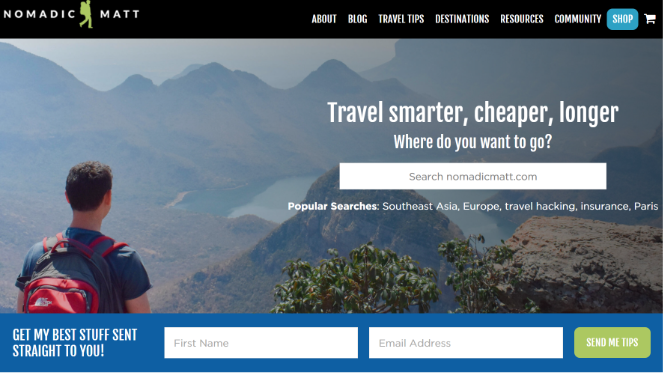
As well as running a successful blog, Nomadic Matt is also the best-selling author of the budget travel book “How to Travel the World on $50 a Day.” He has been traveling and teaching people how to travel on a budget for over 10 years.
There are many professional travel bloggers you can look at for inspiration. Look at their blogs and see if their posts have a theme, which will help you get a good idea of their niche.
To help you decide on your travel niche, ask yourself:
- What are you an expert in?
- How do you like to travel?
- What do you want to be known for?
- Is your intended audience interested in what you have to share?
Answering questions like these will help you figure out what exactly you want to blog about.
Also, try combining the travel niche with another niche. For example, you could become a travel blogger who travels the world for food. This way, you’d be targeting two different audiences, which could bring in a lot of traffic.
After you’ve decided on your niche, it’s time to set up your blog.
Launch your Travel Blog
In this section, I’ll guide you through how to get your brand-new blog up and running.
1. Pick a Name for Your Travel Blog
This is the exciting part: you’re about to take the first step onto your blogging journey.
Before you start your own blog, you’re going to have to pick a memorable name. Something that defines who you are, and you need to make it good.
Grab a dictionary, come up with a list of ideas, play with words, and try to develop something interesting.
Once you’ve narrowed it down, trust your instincts and pick out the best one.
Here are a few tips that will help you pick a name for your travel blog.
Pick a Unique Name
This almost sounds like a piece of cliched advice because this phrase gets thrown around a lot. Everyone knows that you need to be unique to get attention, yet people make the same mistake.
Let’s get to the point. Pick a name that doesn’t have words that everyone else uses, like wanderlust, adventurous, or wandering. They’re too common!
Think outside of the box, ask your friends for help if you need it. Just to give you inspiration, here are some of our favorite travel blog names:
- Anywhere We Roam
- The Travel Diaries
- Another Escape
- Indie Traveller
- Along Dusty Roads
Notice how each of these blogs doesn’t directly scream that it’s a travel blog? Each of these names seems like they have a story to tell, and that’s what grabs attention.
Brainstorming can take a lot of time, and it can be frustrating, which is why I recommend Nameboy. It can help you save precious time.
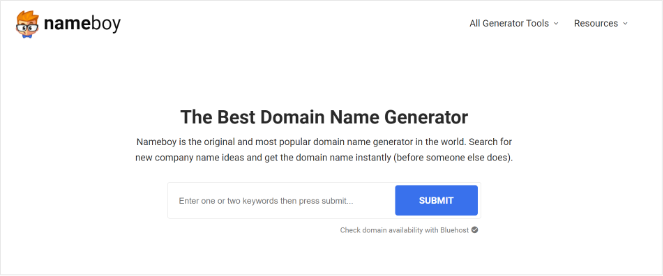
Nameboy is a free blog name generator tool that helps you brainstorm ideas.
All you have to do is add a keyword in the search, and Nameboy will do the rest. It will generate thousands of ideas in a matter of seconds. You can add these to your list and then review them later.
Keep it Easy to Remember
This one is, again, a no-brainer. When you’re brainstorming for a blog name, keep it short, simple, and easy to remember. And for the love of everything you hold dear, don’t misspell words.
People often modify words by using a different spelling. For example, spelling “traveler” as “travlr” is not a good idea.
It may look cool, but it will make it very difficult for your audience to find your blog online because of the misspelling.
Also, avoid using long names that your audience constantly has to spell out. This may cause them to misspell more often than not. Avoid these at all costs!
Keep Your Brand Name Consistent Across All Platforms
When looking to start a travel blog and picking out a name, make sure you have the same name available on social media channels.
You need to maintain synergy across all platforms. If the account for the name you like isn’t available, then consider changing the name to match everything. You need to be easy to search.
Be Future Proof!
Don’t pick a name that’s too specific. If you’re a traveler, you’re probably not going to restrict yourself to traveling only to Europe.
Choosing a name like Europe Travel Diaries isn’t going to make sense if you ever decide to travel outside of Europe.
And don’t restrict yourself to a specific niche if you think your content will grow with you as a traveler. Pick a name that is for the ages!
If all else fails, you can use your real name like Drew Binksy did.

He used his own name to brand himself as a travel blogger. If he can do it, so can you.
2. Set Up your Blog Hosting and Domain
Now that you’ve picked out your name, you need to get yourself a blog hosting and a domain name.
Blog domain and hosting are often sold as a pair and with a good discount.
Though there are many blog hosting services out there, our favorite is Bluehost.
Bluehost is a reliable hosting service with an excellent customer support team.
Bluehost is also the officially recommended hosting service by WordPress. Speaking of WordPress, Bluehost makes it very easy for you to install WordPress with its easy step-by-step guide.
And best of all, they also toss in a free domain name registration when you sign up for their hosting.
We’ve partnered with Bluehost to give our readers an exclusive discount. Instead of paying the usual $8.99/month, you’ll only have to pay $2.75/month. All you have to do is click on the link below.
Get Bluehost TodayWhen you click on the link above, you’ll be redirected to Bluehost’s website. Once you are there, click on Get Started.

Next, you need to choose a payment plan for your hosting. Since you’re starting a brand new blog, I recommend that you select the basic plan.
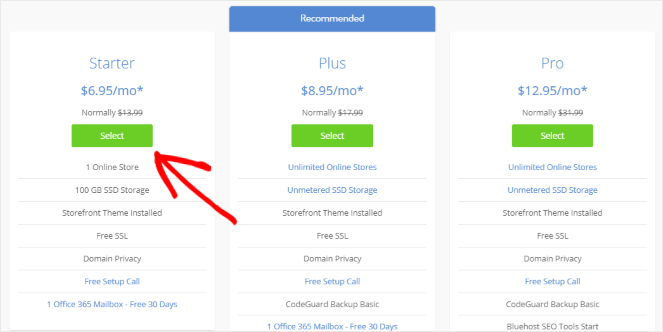
Click on Select, and then you’ll be taken to the next page.
If you want to search to see if a domain is available, type into the box at the left of your screen.
Or if you’ve already purchased a domain, then type it in the box at the right. If you can’t decide at that moment, you can also click on the Choose Later! Option.
Then on the next screen, you will see a summary of your package information. Uncheck or check the boxes as needed, and once you’ve done that, you will have successfully registered your domain and bought your hosting.

Now, it’s time to install WordPress.
3. Install WordPress
In this section, I’ll show you how to install WordPress on Bluehost. If you want to learn how to install WordPress on other hosting services, then check out our detailed guide on how to install WordPress for more information.
After you’ve set up your Bluehost account, log in using the credentials sent to your email address.
After you’ve logged in, click on the My Sites tab and then click on the Create Site button on the right.
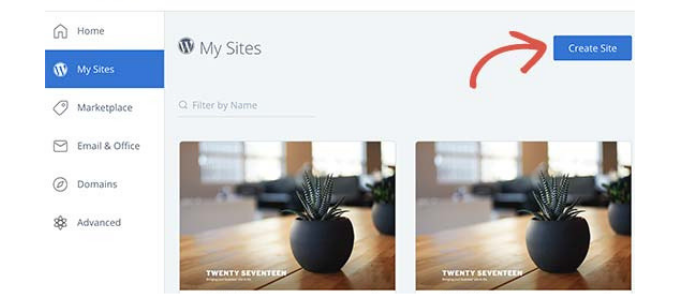
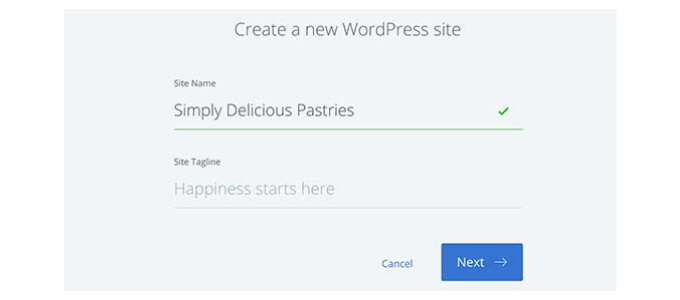
You’ll then be taken to the WordPress installation wizard. Then, you need to add your site title and tagline. Once you’ve done that, click on the Next button.
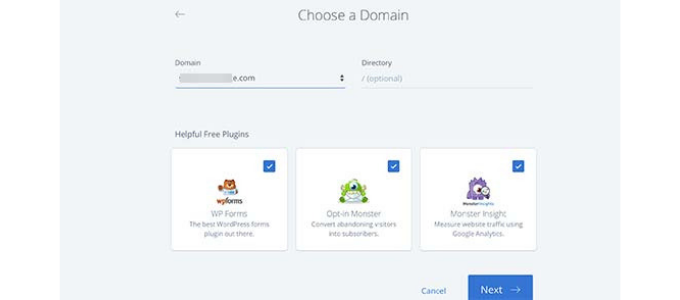
Now you need to select the domain for your travel blog. Click on the Next button to start the installation.
After a few minutes, you’ll get a message that you’ve successfully installed WordPress along with your credentials. You will also be sent the same details to your email address.
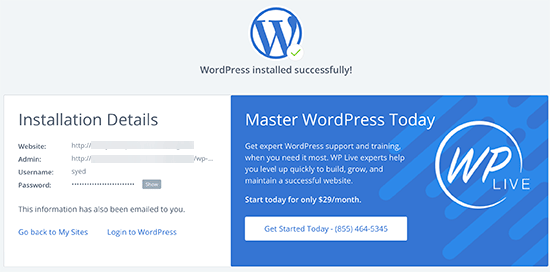
You can now successfully log in to your WordPress admin area using the credentials you got in the email.
That was easy, wasn’t it? Now let’s get to designing your blog.
Customize your Blog’s Design
In this section, I’ll help you design your blog to make it look professional and pretty!
Pick and Install a WordPress Theme
The first thing that you need to look into when you’re ready to start designing your blog is a WordPress theme.
But the thing is, there are literally thousands of themes to choose from, and if you start reviewing each one of them, it’s probably going to take you a lifetime or two.
This is where we come in, we’ve helped launch hundreds of blogs, and we know precisely which themes are the best. We did the research so that you don’t have to.
But before we reveal our top WordPress themes, let’s talk about how to choose a WordPress theme.
There are three top factors that you need to consider when choosing a WordPress theme.
1. Responsive Design
A responsive WordPress theme will make sure your blog looks great on any device.
This is important today when many people surf the web on their mobile devices. Plus, it’s also good for SEO.
In 2019, Google officially announced that they will prefer the mobile version of websites and blogs.
So, if you pick a theme that doesn’t work well on mobile devices, you’re going to lose a lot of organic traffic.
2. Simplicity and Minimalism
A good WordPress theme shouldn’t be crowded with unnecessary features.
Those features may look cool and visually appealing, but they tend to slow websites down. That’s a big no if you want to compete in a competitive industry like travel blogging.
You’re readers don’t have the time to sit around and wait for your blog to load. They’ve got better things to do!
Pick a theme that’s light and doesn’t affect your blog’s page speed. To test the page loading speed of a website, check out IsItWP’s website speed test tool.
It will tell if your page is slow and give valuable information on how to fix your website speed.
3. Reviews
This one is again a no-brainer. Go through the reviews of the WordPress theme that you are about to pick.
You might find some issues that you didn’t notice before and reviews also give you a good idea about the theme’s reputation.
If the reviews are bad or if they look like they are paid reviews, ditch it.
Our Top WordPress Themes
Ok, so now that you know how to pick a good WordPress theme, I’ll now share my top picks.
Divi

Divi is a popular WordPress theme that also comes with a page builder. You can use the visual drag and drop builder to customize every part of your travel blog.
It also offers many layouts for travel blogs and websites. And brand new layouts are added weekly.
Astra

Astra is another popular multi-purpose WordPress theme that comes loaded with perfect features for your travel blog.
It comes with a fullscreen header background image, a call to action button, featured tours sections, review sections, and more. Astra is also an ideal theme for travel agencies and adventurers.
OceanWP
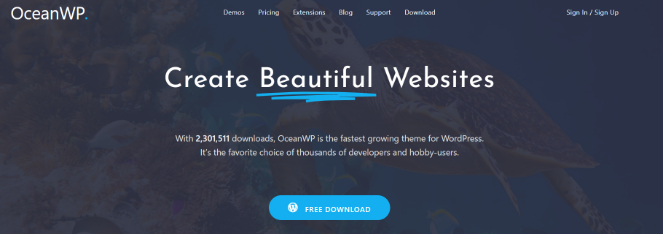
OceanWP is another excellent WordPress theme for travel blogs. It’s one of the fastest-growing WordPress themes with over 2 million downloads.
It includes a beautiful homepage template and offers a lot of customization. You can easily design your travel blog the way you want.
How to Install a WordPress Theme
Now that you’ve picked a theme for your travel blog, it’s time to install it on your WordPress blog.
Installing a WordPress theme may sound overwhelming, but it’s actually very simple.
Login to your WordPress admin area and go to Appearance » Themes. Then, click on Add New.
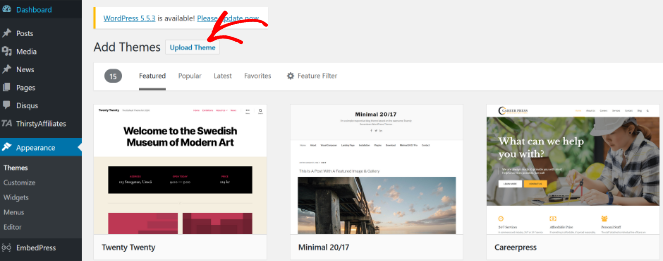
Now you need to upload the zip file of the theme that you purchased. Click on Upload Theme and then click on Browse and select the zip file that you just downloaded.
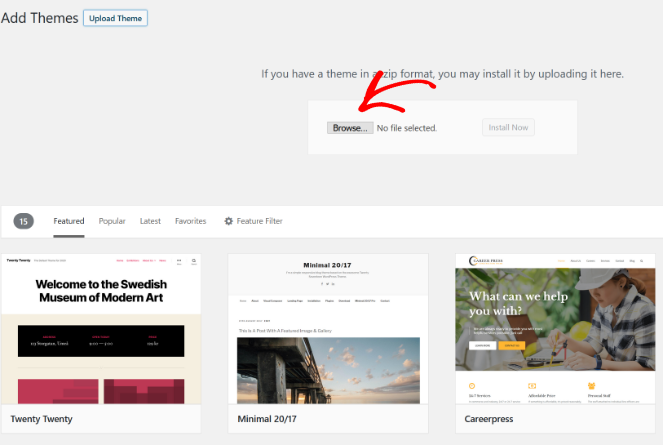
Once the zip file is uploaded, click on Install Now to complete the process.
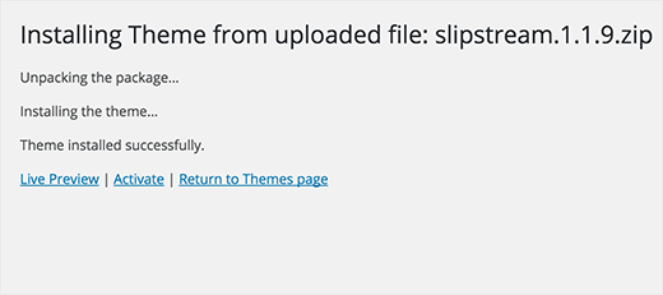
Congratulations, you’ve successfully installed a WordPress theme on your travel blog.
Must-Have WordPress Plugins for your Travel Blog
The best thing about setting up your blog on WordPress is that it offers thousands of plugins to optimize your blog and help improve user experience.
In this section, I’ll list down the must-have plugins that can help you improve your blog.
MonsterInsights

MonsterInsights is a Google Analytics plugin that is used to monitor your blog’s performance.
With MonsterInsights, you can easily connect Google Analytics with your blog, so you can see how visitors are behaving on your website.
You need it to make sure that all your hard work doesn’t go to waste. MonsterInsights helps you optimize your website accordingly to increase your traffic, subscribers, and revenue.
Speaking of subscribers, the next plugin in our list will help you increase your email subscribers fast!
OptinMonster

OptinMonster is the best lead generation tool in the market. With OptinMonster, you can create beautiful email popups to grow your email list.
OptinMonster has many features that help you turn visitors into subscribers, but our favorite is the Exit-Intent feature. It allows you to convert abandoning visitors into email subscribers.
The Exit-Intent feature is able to track when a user is about to leave your blog and send them a targeted message at exactly the right time.
You could use the popup to show an exciting offer, lead magnet, or perhaps you could offer them a free ebook.
Either way, there is a good chance that that abandoning visitor will turn into an email subscriber or a customer.
Check out our OptinMonster review for more details on its features.
Akismet
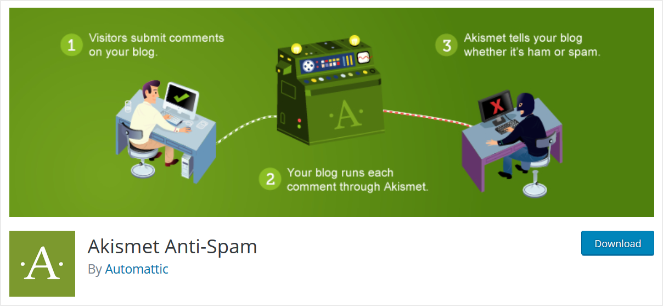
Don’t you just hate it when you write a 2000 word blog post and some random spammer plugs in his website link along with the comment “great blog”? They don’t even have the courtesy to write one whole sentence!
You don’t need that kind of negativity in your life, and this is where Akismet comes in. It blocks spam comments and deletes them automatically. Do yourself a favor and install it on your blog. It’s free!
All in One SEO
All in One SEO, or AIOSEO for short, is a powerful SEO plugin for WordPress. It helps you optimize your WordPress blog posts, and your entire site, for search engines.
In their own words, they take the pain out of SEO and make things much easier.
AIOSEO helps you rank on Google and other search engines. It takes care of mundane SEO tasks so you can focus on doing what you do best: travel and write stories.
AIOSEO has many features like submitting sitemaps to Google, creating a robots.txt file, but best of all, AIOSEO uses its TruSEO On-Page Analysis to provide you with an actionable checklist to optimize every post on your blog.
WPForms

WPForms is a drag and drop form builder for WordPress. It’s very popular as it has over 4 million active downloads. It lets you create simple contact forms, survey forms, conversational forms, and many other forms.
You need contact forms so that your readers can get in touch with you.
More often than not, you can get constructive feedback, praises, and appreciation for what you do for your community. And as a blogger, you need that kind of motivation to keep going when you create a blog.
Other than that, you can use WPForms to conduct surveys. Surveys like asking your reader’s opinion on which destination you should go to next. Or you could simply ask for general feedback.
SeedProd
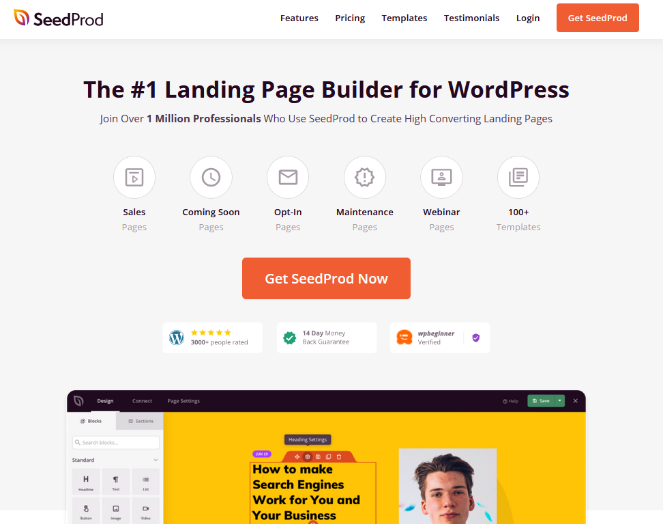
SeedProd is the best landing page builder for WordPress. You can create awesome sales pages, webinar landing pages, coming soon pages, and more.
Creating landing pages on your own can be a challenge because it requires you to know some level of coding. And since landing pages are essential for optimizing conversions, you need to know how to build one.
Luckily, SeedProd has an easy-to-use drag and drop interface that lets you create visually stunning landing pages.
Check out our post on the best landing page examples to get an idea of the high-converting landing pages you can create with SeedProd.
Smash Balloon
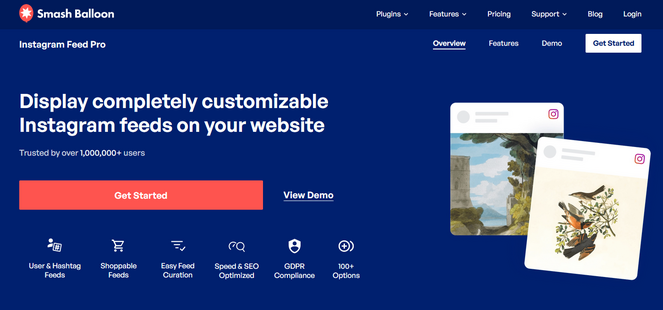
Smash Balloon is a plugin that lets you embed social media feeds into your travel blog’s pages.
Social media is a massive hit for travel bloggers. Especially Instagram, it’s packed with travel stories and hashtags. Needless to say, if you start a travel blog, you need the backing of Instagram and other social channels.
So, using Smash Balloon, you can easily display your Instagram feed on your blog. This makes it easier for your audience to explore and learn more about your travels.
Smash Balloon also offers social media feed plugins for Facebook, Twitter, and YouTube.
These were some of our top picks for WordPress plugins that you need for your travel blog.
Other notable mentions are:
- Sucuri: Sucuri protects your blog from malware threats, DDoS, and any type of attack. It’s a must-have plugin to protect your blog from hackers.
- RafflePress: Down the road, if you ever want to run a giveaway for your loyal audience, then RafflePress is your go-to tool. It lets you effortlessly create giveaways in a few seconds.
- WPRocket: It’s a caching plugin that boosts your blog’s page load speed. It’s an excellent tool to help you improve your user’s experience.
Well, that’s about it. I’ve listed all of my favorite plugins for your travel blog.
Next, I’ll help you plan your content.
Plan Your Content
Now you need to come up with some blog posts for your travel blog. So, start writing down a list of topics that your audience would be interested in.
You can also check out our list of blog post ideas for inspiration.
Aside from sitting down and writing a blog post though, there are other steps you should consider. I’ll go over them in this section.
Keyword Research
Before you plan your content, you need to do some keyword research so that you know you’re targeting the right audience.
Imagine putting all that content together and not get any traffic or search engine rankings. That would be disappointing.
Keyword research helps you write about topics that your audience wants. This helps you get more relevant traffic and helps you rank well.
There are many tools like SEMRush, Ahrefs, UberSuggest, and others that can help you with your keyword research.
And there are other techniques you can try for your keyword research, but to be fair, it can’t be covered in this small section.
Luckily we have an in-depth guide on how to do keyword research for beginners. Go check it out, it has tons of useful information.
Plan Your Content Calendar
Now that you’ve done your research and have come up with topics that interest your audience, it’s time to start planning your content calendar for your first blog posts.
First, figure out a consistent blogging schedule and stick to it.
Take a look at our post on how often you should blog to decide what works for you.
If you can’t commit to your schedule when you first start blogging, you won’t survive for long. The best way to keep yourself focused is to create a content calendar. This way, it will be easier to manage your time and publish posts consistently, giving you a better chance of joining the ranks of successful travel bloggers.
Though there are many tools available that help you create content calendars, Google Calendar is the best choice for us.
It’s free, and you can set up reminders so that you don’t miss your deadlines.
Create High-Quality Images
Of course, your readers will want to see beautiful photos of the travel destinations you’re writing about on your blog. This will make your blog more engaging.
If you take your own photos during trips that you can use in your travel guide for that destination, that’s great!
But what if you’re not a photographer?
Don’t worry, there are plenty of free tools you can use to find and create awesome images for your blog.
For example, you can use Unsplash to find free travel photos. They have tons of beautiful, high-quality, royalty-free images that you can use.
We have a dedicated article on how to find free images for your blog, check it out.
And you can also use Canva, which is an online image editor that lets you easily create professional designs.
Promote Your Travel Blog
After launching your travel blog, you can’t just expect a ton of readers to show up immediately. To get more visitors to your blog so you can become a successful travel blogger, you need to promote it.
As I mentioned earlier, being active on social media platforms like Instagram is the most effective way to promote a travel blog.
So, make sure you’re consistently posting content on social media to get your travel blog noticed.
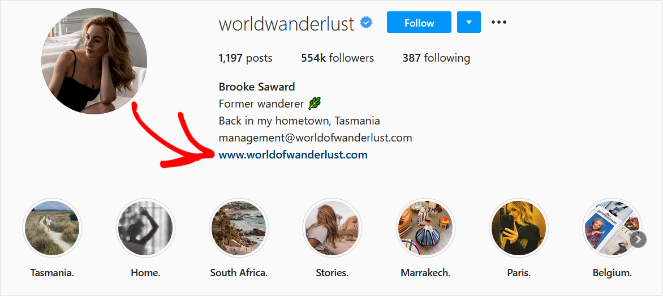
In this example, travel blogger Brook Saward shares photos from her latest trip to Paris. In the caption, she uses the hashtag #Paris. This makes it easy for other travelers interested in that destination to discover her content.

She also links to her blog in her Instagram bio, which helps drive traffic from social media to her website.
Getting your top travel content out on social media platforms is essential when it comes to growing an audience and gaining organic readers who will keep coming back to your site again and again.
How to Make Money with a Travel Blog?
There are a lot of ways travel bloggers can make money. But the #1 primary source of income when it comes to travel blogging is affiliate marketing.
Affiliate marketing consists of recommending or promoting other people’s products and services and earning a commission if readers end up buying them.
There are many companies out there that offer affiliate programs, but you should only promote products that you actually use or would want to use in the future and, most importantly, only recommend those that will meet your audience’s needs.
You could start recommending insurance companies. It’s good for travelers to have insurance so that if they run into a mishap, the insurance company will have them covered.
Virtual private network (VPN) service is another good option. When people travel to a different country, they might find that the internet is censored or the content they want to watch isn’t available in that country. A VPN will help them bypass these censorship laws.
You can recommend booking services like booking.com. They offer a decent affiliate commission. Travelers use it every day, so it makes sense to recommend it to your readers.
You can also look for companies that offer affiliate commissions on travel gear and start recommending those.
To find affiliate products to promote, you can sign up for various affiliate networks. You can browse through their product list and pick out the most relevant ones.
Some of the most popular affiliate networks are:
You can also check out our guide on how to monetize your blog, it has a lot of tips on how you can turn your travel blog into a money-making machine.
Frequently Asked Questions
How Do I Start My Blog Without Traveling?
There are a lot of famous travel bloggers who create a travel blog and write about places they’ve never visited.
Yep, you read that right! Many travel bloggers write on topics like “coolest AirBNB apartments in Bali” or “inspiring traveling quotes” and write all this from their comfy beds.
I talked about knowing your audience and researching topics. If you want to be a travel blogger without traveling, you need to spend a reasonable amount of time researching.
Look into other travel blogs and see what topics they write on and how you can add more value to them. You can still provide valuable tips and tricks even if you’re unable to travel yourself.
Now that you know how to start a travel blog without traveling, nothing is stopping you!
How Do I Start a Travel Blog for Free?
There are many free blogging platforms available that you can use to start your blog and write about your travel experiences.
You can signup for WordPress.com, Medium.com, and Blogger.com. These three are the most popular free blogging platforms where you can set up a blog.
But don’t expect your blog to grow if you build a travel blog with a free blogging platform. You can’t monetize your travel blog, and you can’t reach out to your audience because free blogs don’t have the necessary features.
Another downside is that your content will be owned by the free blogging platform that you are writing for. So, if for some reason they decide to shut down their service, you will lose all of your content.
If you are serious about creating a successful blog and making a name for yourself as a travel blogger, don’t go for the free option.
How Much Does it Cost to Start a Travel Blog?
A basic travel blog won’t cost you much money at all. Like I mentioned earlier, all you need to purchase to start is a domain name and blog hosting. With Bluehost, it’s very affordable.
As you grow your blog and start making money, you may decide to buy a premium theme or pro plugins to optimize your blog. But initially, you don’t need to worry about all that. You can start with a free theme and upgrade as your new travel blog starts to take off.
Key Takeaways
- If your dream is to start a successful travel blog from scratch, finding your niche is crucial. Your travel blogging niche could be anything from solo female travel to adventure or budget travel. Understanding what makes you unique in this crowded market is essential for standing out and attracting a dedicated audience.
- Setting up your travel blog involves a few critical steps. First, choose a memorable name that’s easy to remember and spells out what your blog is about. Next, secure a reliable hosting service like Bluehost and install WordPress. Choosing the right WordPress theme is also key, focusing on responsive design and simplicity for a better user experience.
- Remember to install essential WordPress plugins that can enhance your blog’s functionality and user engagement. These tools can help manage SEO, fight spam, and grow your email list. Plugins like MonsterInsights and OptinMonster are especially useful for tracking performance and converting visitors into subscribers.
- Effective content planning and promotion are vital if want to start a travel blog. Start by conducting keyword research to ensure your topics resonate with your audience. Use tools like Google Calendar to maintain a consistent blog writing and posting schedule. High-quality images are also crucial, so utilize resources like Unsplash and Canva to create appealing visuals.
- Many travel blogs are monetized with strategies like affiliate marketing. Promote products or services you trust and that align with your readers’ interests. Networks like ShareASale and Amazon Associates can be a great way to make money.
- Finally, stay persistent and keep refining your strategy. Travel blogging is a competitive field, but with the right approach, you can turn your passion for travel into a profitable venture. Be sure to explore further resources and continuous learning to keep up with blogging best practices and SEO trends.
Final Thoughts
We’ve now reached the end of our journey. I hope this guide helped you learn how to start a travel blog and make money online.
If you like this guide on starting a travel blog from scratch, you’re also going to love our guide on getting more traffic for your blog. It’s a must-read if you are serious about becoming a professional travel blogger and making money with your travel blog.
And don’t forget to sign up for our newsletter for more blogging tips.


I really like your blog. Gaining experience in different fields. Travel blogging develops many skills such as writing, photography, marketing, etc. You will discover new things and learn new stuff which can turn into your full-time job. your blog is very helpfull.
I love reading your blog. They are very informative looking forward to read more from you