S o, you’ve finally made the decision to move your blog from WordPress.com to WordPress.org, but you have no idea how to do it? Don’t worry. We’ve got you covered.
When creating a blog, it’s always a good idea to think about the future. If you want your blog to be successful, then you need to start with the right blogging platform now, which is WordPress.org.
With WordPress.org, you can have complete control over your blog. You can customize it how you want, monetize it any way you want, and more. And that’s not the case with WordPress.com.
But, if you’ve already started a blog on WordPress.com, don’t worry. You won’t have to lose all of your hard work.
In this tutorial, we’ll show you step-by-step how to move your blog from WordPress.com to WordPress.org.
Without further ado, let’s begin.
In This Guide:
Why Move Your Blog from WordPress.com to WordPress.org?
With WordPress.com, anyone can start a blog just by creating a free account. A lot of new bloggers think that this is the best way to start a blog and save money at the same time.
But the more you use WordPress.com, the more you’ll realize that it has a lot of limitations. You can’t monetize your blog, install important WordPress plugins, customize your blog, and more.
This is why experienced bloggers prefer WordPress.org, because it’s a self-hosted platform that gives you complete ownership of your blog.
This means that you have no restrictions; you can build and grow your blog however you want.
And you don’t have to follow the Terms of Service set by another company or worry about your blog getting deleted (as long as you’re not doing something illegal).
Some of the many advantages of WordPress.org are:
- It’s free and easy to use
- You have endless customization options with WordPress plugins and themes
- You can monetize your blog by starting an online store or by running ads
- It gives you the ability to build any type of blog you want
To get a clearer understanding of how WordPress.org is different from WordPress.com, read our in-depth comparison.
Before we get started with the tutorial on how to migrate from WordPress.com to WordPress.org, here are some things you need…
Before You Begin: Get a Domain Name and Blog Hosting Service
Prior to moving your blog to WordPress.org, you need to get blog hosting and register a custom domain name.
For that, we recommend Bluehost, which is one of the best blog hosting services on the market and it offers a super simple step-by-step setup.
And if that’s not enough to convince you, then you should also know that Bluehost is officially recommended by WordPress.org itself. They host over 2 million websites all over the world and they get high star ratings from their users because of their ease of use and reliability.
Plus, Blog Tyrant readers can get an awesome deal that includes a free domain name! Check it out below:
Exclusive offer for BlogTyrant readers
We have partnered up with Bluehost to get 60% off for our readers! You also get to register a FREE domain for a year which normally costs around $14.99 per year.
Claim this Exclusive Bluehost offerHere’s how to set up your new Bluehost account…
Once you click on the link above, you’ll be taken to the Bluehost website. Click on Get Started to begin.

Then, you will be asked to choose a pricing plan. Pick the one that suits you best.
Next, you’ll be asked to create a new domain or use a domain you own.
If you already own a domain, type it into the field under the Use a domain you own heading and click Next. If you want to create a new domain, follow the same steps under the Create a new domain section.
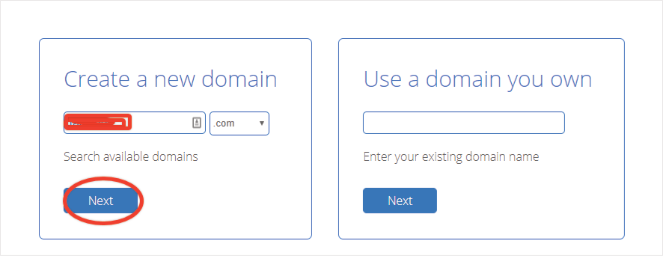
And if you want to wait and think about it, then you can also click on “Choose free domain later.”
Now, you’ll have to enter your account information and select the account plan. If you want the best value, then select the 36 months price.
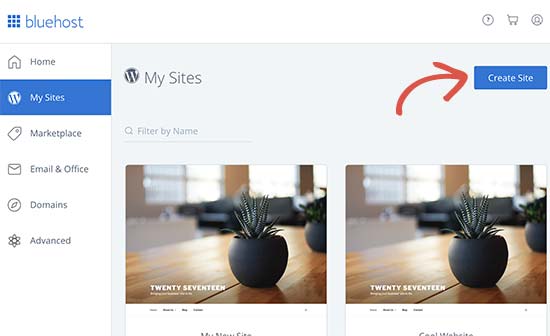
After providing your payment information and completing the purchase, you’ll get an email with the login credentials to your web hosting control panel. Once you’ve logged into your Bluehost account, go to the My Sites tab and click on Log into WordPress.
Enter your credentials to log in and then click on the Create Site button.
This will launch the Bluehost WordPress installation wizard. All you need to do is follow the simple steps to install WordPress!
If you still need help with the installation, check out our guide on installing WordPress for more information.
Now that we have that out of the way, let’s look at how to transfer your WordPress.com blog to WordPress.org.
Step 1: Export Your Existing WordPress.com Content
First, login into your WordPress.com blog, and from the left-hand menu click on Tools » Export. Then, click on Export All as shown in the image below.

This will allow you to export your blog content to your computer. You’ll get a notification once the zip file is ready to download, then all you have to do is click on the Download button.

Once you’ve downloaded the file to your computer, keep it safe as you’ll need it later.
Step 2: Import Your Content To WordPress.org
Just as a reminder, before you get started with this step, you’ll have to install WordPress on Bluehost. So, make sure you’ve followed the steps to install WordPress.
Once you have WordPress installed on Bluehost, log in to your WordPress.org blog and then click on Tools » Import from the left-hand menu.

Next, you need to install the official WordPress importer. Click on Install Now to begin the installation.

WordPress will install the plugin without you having to leave the page. Once the installation is complete, the same text will change to Run Importer. Click on that link to continue.

Then you’ll be asked to choose a file that you want to import. Click on Choose File and select the file that you downloaded in the first step.
After selecting the file, click on the Upload file and import button. WordPress will then import your old files on your new WordPress blog.

When you start importing, you’ll have the option to assign the imported posts to an existing author or to a new one. You’ll also have the option to import file attachments, so make sure that you check the box if you want to upload your images correctly.

Once you’re satisfied with the settings, click on Submit to complete the process.
Step 3: Import Blogroll Links
If you’ve been using the Blogroll links feature on your old blog, then it’s a good idea to import them to your new blog. And if you weren’t using this feature, feel free to skip this step.
To export your Blogroll link, you need to download the OPML file. It’s similar to an XML file and it stores all your links and link categories.
To download your blog’s OPML file, simply add this parameter “wp-links-opml.php” to the end of your blog’s site address.
It should look something like this: example.wordpress.com/wp-links-opml.php.
Or, if you’ve got a custom domain, then it should look like this: example.com/wp-links-opml.php.
Once you’ve opened your OPML file in your browser, you can save the file by pressing CTRL+S (Command+S on Mac) on your keyboard.

Now that you’ve downloaded the OPML file, you need to import it to your new WordPress.org blog.
To do that, you’ll now need to install and activate the Link Manager plugin. If you need help with installing a plugin, check out our guide on how to install a WordPress plugin for more information.
Once the plugin is installed and activated, you will see a new Links menu on your WordPress dashboard.

Next, you need to install the OPML Importer plugin on your blog.
After that plugin is installed and activated, go to your WordPress dashboard and click on Tools » Import.
Under the Blogroll section, click on Run Importer.

When you click on the Run Importer button, you’ll be taken to the blogroll importer page, where you will have to upload the OPML file you had saved earlier.

Once you click on the Import OPML File, WordPress will import the links and link categories.
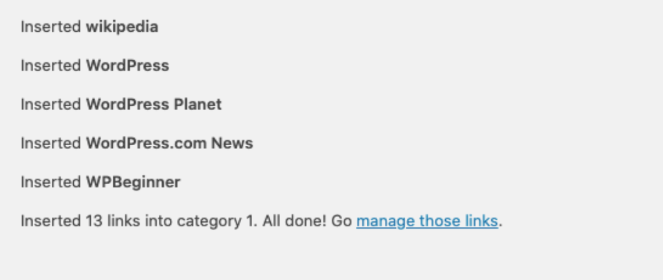
When it’s completed, a success message will appear on the screen.
Step 4: Check Your Blog for Any Errors
If you’ve followed the instructions correctly, your blog should look exactly the same as it was on WordPress.com. But it’s still a good idea to double-check the migration and ensure that all the content was imported correctly.
So, check to see if all your blogs posts and images are loading correctly.
A common image problem that can arise is if your image URL starts with files.wordpress.com, then it can’t be converted. To fix this issue, you can download the Auto Upload Images plugin to transfer your images properly.
Here’s a tutorial on how to import external images in WordPress.
Once you’ve made sure everything looks good, it’s time to take care of the final step.
Step 5: Set WordPress.com to Private or Redirect Visitors
If you want, you can redirect your old blog to the new one to preserve your blog SEO. If you don’t, then you can simply set your WordPress.com blog to private.
In this section, we will show you how to do both of these things.
Option 1: Set Your WordPress.com Blog to Private
To set your old blog to private, simply login to your WordPress.com blog and then go to Settings » General from the left-hand menu and then scroll down to the Privacy section.

Once you set it to private, your blog will only be visible to you or those with login credentials.
Option #2: Redirect Visitors to Preserve SEO
If you’ve been writing for a long time and have built a loyal audience, then it would be best to redirect your old blog to the new one.
Redirecting your blog to the new one also preserves your search rankings. For example, if you were ranking for multiple keywords with your old blog, once you redirect to the new one, you will keep your search engine rankings.
To redirect visitors to your new WordPress.org blog, go to your WordPress.com account, then go to Settings » General. Under the Site address section, click on the redirect link.

Once you click on redirect, you’ll be taken to a new page. Then, all you have to do is enter the new blog domain and click on the Go button.

Keep in mind that this is a paid upgrade. You’ll have to pay $13 per year to keep using the redirect feature.
Once you see that your readers have grown accustomed to your new blog’s address, you can then discontinue using this feature.
However, you’ll still have to keep your old blog set private to avoid duplicate content. Having duplicate content on your blog can get you penalized and you won’t rank on search engines.
That’s it, you’re done! You now know how to move your blog from WordPress.com to WordPress.org.
What to Do After Migrating to WordPress.org
Lastly, let’s talk about how to use your new WordPress blog to its full potential.
First, you need to install essential WordPress blog plugins that can help you improve your blog’s overall look and performance.
Since you weren’t able to take advantage of WordPress plugins on your free WordPress.com blog, this part should be fun!
Off the top of our head, here are the top plugins that we recommend:
- MonsterInsights: Learn more about your audience and where your traffic is coming from. Check out this tutorial on how to install Google Analytics on your blog.
- AIOSEO: Optimize your site for SEO to improve search engine rankings and grow traffic to your blog.
- WPForms: Easily build a contact form so your readers can get in touch with you. Here’s a tutorial on how to create a simple contact form.
- WP Super Cache: Speed up your website and improve the user experience.
- Sucuri: Protect your site from hackers and other security threats.
- PushEngage: Send push notifications to your subscribers to promote your latest blog posts and drive traffic to your site.
- OptinMonster: Create optin campaigns to turn site visitors into email subscribers. Take a look at our OptinMonster review to see why it’s the best tool to grow your email list.
You can get the complete list of WordPress plugins and why they’re essential in our list of the best WordPress plugins.
And don’t forget to choose the perfect theme for your blog. Check out our picks for the best WordPress themes for bloggers to find one that suits your needs.
Frequently Asked Questions
Running into an issue that we haven’t covered in the tutorial above? Here are some common questions users have when migrating from WordPress.com to WordPress.org.
I already have a WordPress.com custom domain. Can I still move to WordPress.org?
Yes, if you have a domain registered before moving to WordPress.org, then all you need is a hosting service. You can then point the existing domain to WordPress.org with the help of your hosting provider.
How do I transfer my WordPress.com subscribers?
You can quickly transfer your WordPress.com subscribers by using the JetPack plugin. All you need to do is install and activate the plugin. Then, follow this tutorial.
How much does it cost to move to WordPress.org?
Like we mentioned previously, WordPress.org is free to use, you’ll just have to pay for the hosting and the domain name. And if you decide to use the redirect feature on WordPress.com, you’ll have to pay an extra $13/year.
Overall, your total annual cost for moving to WordPress.org would be around $122.
Will my blog go down while I make the switch?
No, if you follow this tutorial correctly, you won’t have to worry about any downtime.
Well, there you have it. We hope that this guide helped you learn how to move from WordPress.com to WordPress.org.
If you have any questions or are confused about a step in the tutorial, please let us know in the comments below. We will get back to you with a solution.
If you liked this tutorial and want to customize your new WordPress.org site, check out our post on the best drag and drop page builders.
And don’t forget to sign up for our email newsletter for more helpful blogging tips!



0 Comments
Join in. The comments are closed after 30 days.