
A re you wondering how to make a WordPress website private? Keep reading and we’ll show you how, step-by-step.
While many blogs are created with the purpose of attracting readers and making money online, some people choose to start a blog without those goals in mind.
In fact, you may want to keep your content away from the public eye completely.
So, you might be wondering, can I make my blog private? The answer is yes!
In this tutorial, we’ll show you exactly how to make a WordPress blog private. We’ve included 4 different methods so you can choose which one works best for you.
Let’s get started.
In This Guide:
But first, let’s find out why you might want to make your website or blog private…
Why Make a WordPress Website Private?
Typically, when you create a blog or website, you want the world to see it.
But, there are certain circumstances when you want to keep your blog private so that only you, or specific users, can see it.
Here are some common reasons to keep your blog or website private:
- Your Site is Under Construction – If you’re still building your website, or doing maintenance, you can keep it private while it’s under construction.
- Keeping a Diary – You want to create a blog to use as a diary and fill it with your private thoughts.
- Building a Family Blog – You want to create a family blog with personal photos of your children, family events, weddings, and more.
- Hosting a Classroom Environment – You want to create a website with lessons and information that’s only available to registered students.
- Creating a Work Space – You can create a website that allows teams to work on projects away from the public eye.
- Protecting Your Content – If you’re worried about your content getting stolen, you can make a private website to keep it safe.
Now that you know the reasons behind it, let’s take a look at how to make a WordPress website private.
Method 1: Make Your WordPress Website Private with SeedProd
One of the easiest ways to create a private WordPress blog or website is with the SeedProd plugin. It’s the best drag and drop website builder for WordPress, used by over 1 million website owners.
With SeedProd, you can easily create custom WordPress themes, page layouts, and landing pages for your WordPress website, no coding required.
Plus, it comes with coming soon pages that allow you to make your WordPress blog private.
Coming soon pages are the best way to make your WordPress site private during development. That’s because they hide the rest of your website while you’re working on it behind the scenes.
Instead of being able to access your blog and other web pages, visitors to your site will only be able to see a coming soon page like in the example below.

Aside from keeping your blog private, you can also use a coming soon page to build hype around your project, get more newsletter subscribers, promote your social media platforms, and more.
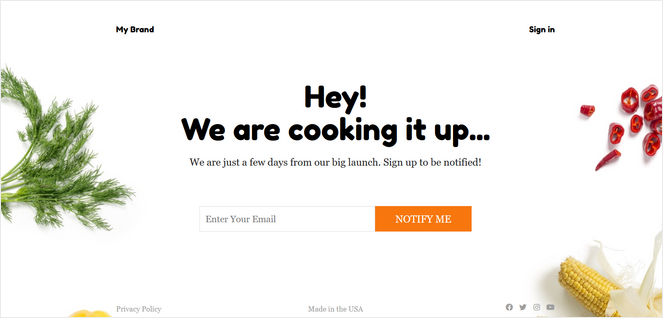
You can customize your coming soon page with anything you want. You can even customize it to act as a home page, while your blog remains private.
Once your coming soon page is live, you can keep your blog private for as long as you want.
Check out our tutorial on how to create a coming soon page for your blog for more details.
SeedProd also offers maintenance mode pages which are perfect for making your website private temporarily. Maintenance mode will also prevent search engines from indexing and ranking your site.
SeedProd comes with 180+ professionally-designed page templates, 80+ pre-made page blocks, smart sections, live previews, integrations with the best email marketing services, and much more.
Learn more in our detailed SeedProd review.
Method 2: Create a Private Members-Only Site with MemberPress
Do you want to make your blog private, but still be able to earn money from it?
You can with MemberPress. It’s one of the best membership plugins for WordPress, used by thousands of creators who together have earned over $1 billion in revenue.
With MemberPress, you can keep all of your website content, or just some of it, hidden behind a “locked door.” Only members have the “key” and will be able to access it.
You can either require users to register for an account to access your website, or you can require users to pay a fee for access.
MemberPress comes with powerful access rules for pages, posts, categories, and other files, so you can choose exactly which website content you want to be members-only.
There’s even a built-in LMS platform that allows you to easily create online courses for your members.
In addition, MemberPress offers content paywalls, timed content releases, content access expiration, pricing pages, coupons, and much more.
For step-by-step instructions, see our tutorial on how to create a membership site.
Method 3: Make Your Blog or Website Private with My Private Site
Another way to create a private blog in WordPress is by using the My Private Site plugin. This free plugin comes with all of the basic features you need to hide your website from the public and restrict viewing access to registered users only.
To get started, you need to install and activate the plugin. If you need help, you can follow along with our tutorial on how to install a WordPress plugin.
Once the plugin is activated, you need to go to My Private Site » Site Privacy from your WordPress admin dashboard. This will take you to a page where you can configure the plugin settings.
First, you need to check the ‘Enable login privacy’ box to make your website private. Then, click the Save Privacy Status button to store your changes.
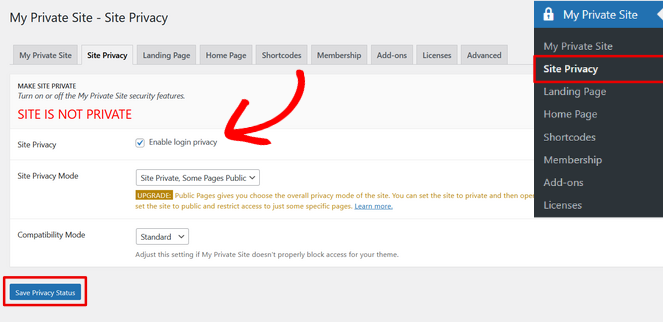
Now that this option is enabled, when users try to visit your website, they’ll see a login screen.
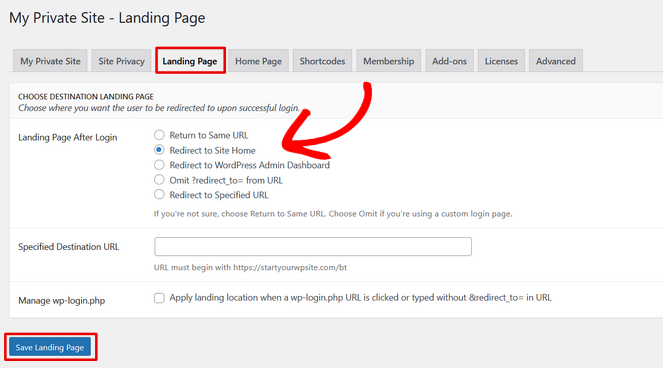
Next, click the Landing Page tab to choose where users will be redirected after they successfully log in.
In the ‘Landing Page After Login’ section, simply select an option such as return to same URL, redirect to site home, etc. Or, you can paste a specific URL in the ‘Specified Destination URL’ field.
Then, click the Save Landing Page button.
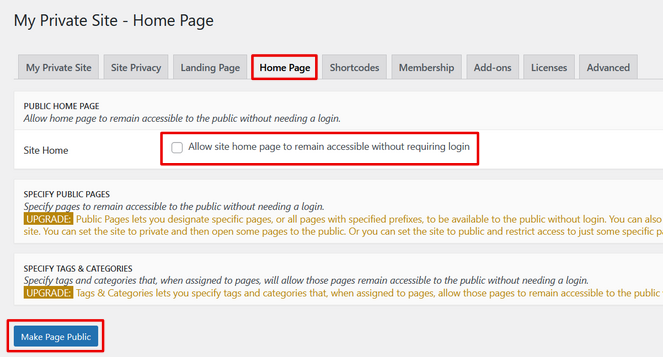
When you click on the Home Page tab, you have the option to make your homepage accessible to visitors, while keeping the rest of your website private.
For this tutorial, we want the entire website to be private, so we’ll leave that option unchecked.
If you decide to enable this option, don’t forget to click the Make Page Public button afterwards.
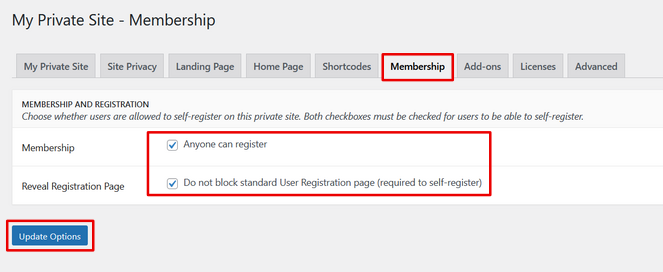
Next, you can click on the Membership tab to choose whether or not you want to allow users to be able to register to your blog.
If you want users to be able to register an account and view your blog, both boxes must be checked. If you don’t want to allow user registration on your site, simply leave both boxes unchecked.
Click the Update Options button to store your changes.
That’s it. Your WordPress website is now completely private.
When users try to visit your site, they’ll only see a login page.
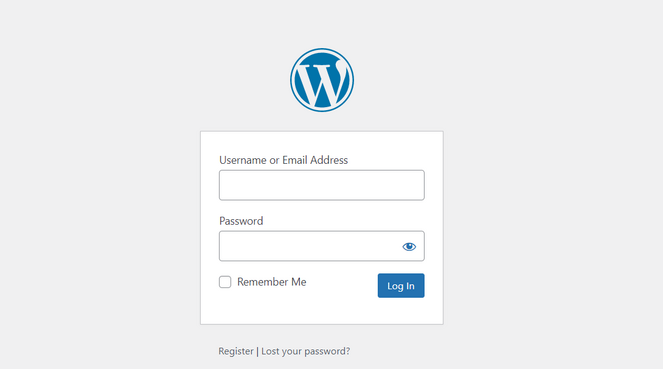
If you enabled the option for users to be able to self-register, they’ll be able to create an account in order to view your website.
Method 4: Making Individual Blog Posts Private
Lastly, if you want your website to be public, but you want to make individual blog posts private, you can do that with the built-in WordPress settings.
Simply open up an existing blog post or create a new one. On the post editor screen, find the Visibility option in the ‘Status & visibility’ meta box.
Then, click on the Public link.
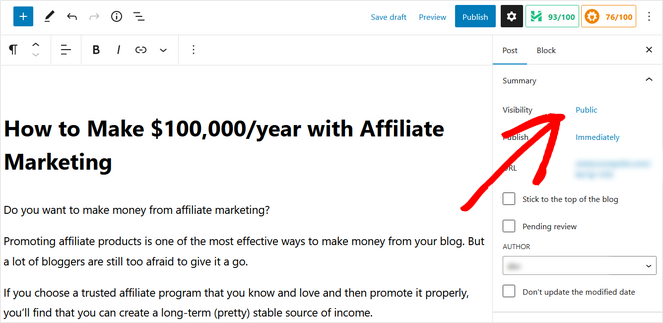
Now, a dropdown menu will appear where you can set the blog post to private. You can even choose to create a private post that’s password protected.
Simply click the option that you want.
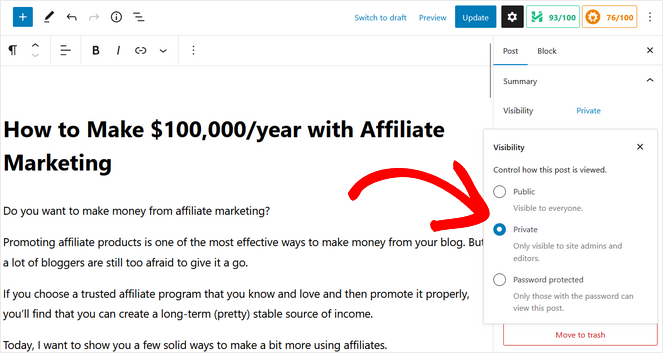
If you decide to create a password protected post, you will have to enter a password. Then, you can give that password to whoever you want to be able to see your blog post.
When you’re finished, don’t forget to hit the Publish or Update button to store your changes.
Now your blog post will be private and only logged-in WordPress admins and editors will have access to it.
So, if you run a multi-author blog, you’ll want to make sure that the other writers have the correct WordPress user roles to view the post.
That brings us to the end of this post! We hope this tutorial showed you how to make a WordPress website private, and with four different methods, you can choose the type of privacy that works best for you.
You may also want to read our article on the best Substack alternatives. These powerful tools can help you easily create a private, paid email newsletter.
While you’re here, make sure you also subscribe to our newsletter to get blogging tips delivered straight to your inbox!


great article just keep on posting this.