D o you want to start a YouTube channel for your blog? YouTube is a great way to promote your blog or brand. Plus, you can monetize it to turn your passion into a full-time career.
In this guide, we’ll show you how easy it is to set up your own YouTube channel. We’ll also show you how to optimize your channel to gain more traffic, subscribers, and views.
Do Bloggers Need a YouTube Channel?
YouTube is the second largest search engine in the world (after Google). It gets millions of views per day.
So, if you haven’t hopped onto this platform, you’re missing out on a huge opportunity to expand your reach and grow your blog.
Now, you may be worried that YouTube will take up all your time and become too much to manage. You need to know that YouTube, like your blog, needs consistency. So, create a schedule that you’re comfortable with, like once a week.
Next, there are easy ways to generate video content. You can turn your blog post content into videos and post them to your YouTube channel (you may also be interested in learning more about the difference between a blog and vlog). This will help you create a strong connection between your blog and YouTube.
So for instance, if you just published a post on tips for creating a successful blog, you could make a YouTube video where you talk about the same thing. You could even tell your users to read all about it on your blog and post a link in the description.
That way, you can send YouTube viewers to your blog. And later on in this guide, we’ll also show you how to send website visitors to your YouTube channel. So it’s a win-win both ways.
In a nutshell, here’s why a YouTube channel is great for bloggers:
- Attract more users to your blog
- Increase brand visibility
- Make your blog more interesting with embedded videos
- Increase engagement
- Improve user experience
One of the best things about having a YouTube channel is that it can help you overcome writer’s block. So, if you can’t come up with new written content, you can make a video that week instead.
Now that we agree a YouTube channel will be beneficial, we’ll show you how to create one next.
How to Create a YouTube Channel
Step 1: Sign up with YouTube
YouTube is owned by Google and the two platforms are intertwined. So before you can create a YouTube channel, you need to sign up for a Google account.
When you’re creating an account on Google, you’ll need to enter a username and password. Then make sure you choose ‘For work or my business’ when they ask you what’s your purpose with this account.
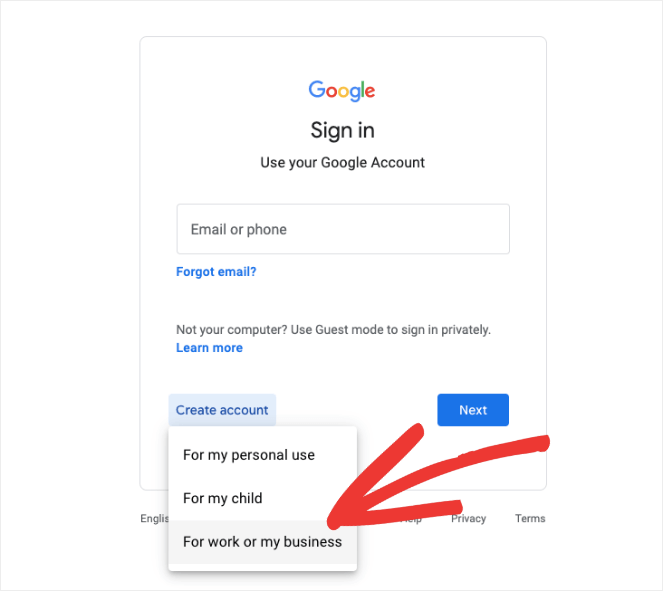
This type of account will allow you to create a brand and customize your YouTube channel accordingly. You’ll even be able to give multiple people access to make it easier to manage your account.
Once you’ve created your Google account, simply use the same login credentials to sign in to YouTube.
Step 2: Configure Account Settings
The first thing you’ll want to do inside YouTube is set up your channel name and logo. Select your profile icon at the top-right corner of the YouTube screen.
From the dropdown menu, click on ‘Create a channel’.
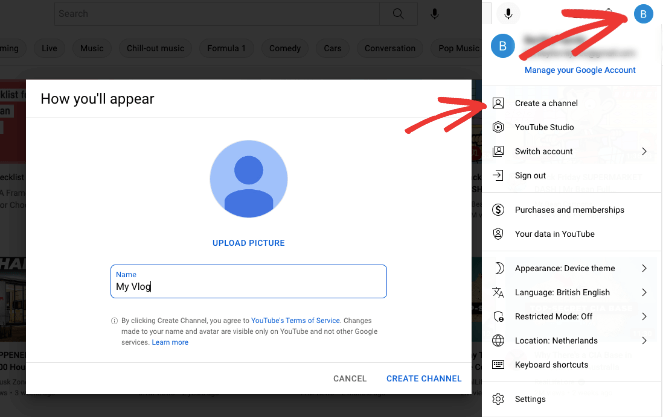
This will open up settings where you can add a custom name and upload a profile picture. Hit the Create Channel button to get started.
Now you’ll see an empty channel and you can begin to customize it.
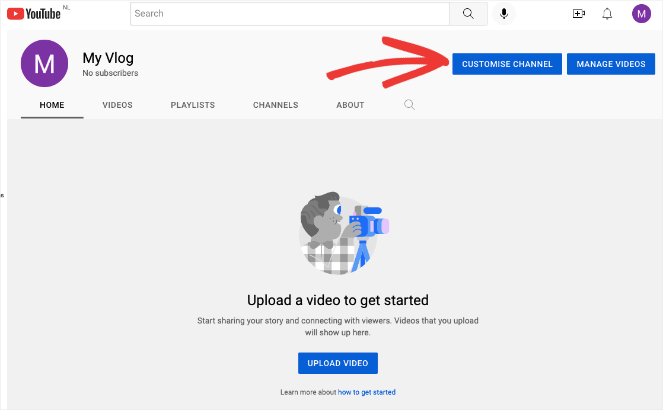
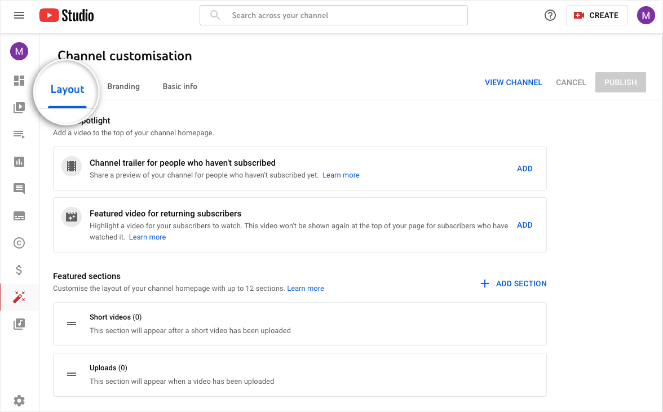
This will open up the YouTube Studio. You’ll see a taskbar on the right-hand side, and a top menu with 3 tabs: Layout, Branding, and Basic Info.
Under the Layout tab, you can add a channel trailer to make it interesting for new users who land on your channel. There’s also an option to show a featured video for returning subscribers. This way, you can customize their experience and they don’t have to view your channel trailer every time they visit your channel.
Next, under the Branding tab, it’s important that you add a picture and banner here that’s relevant to your blog. It will serve as your branding and allow users to identify your channel and understand what it’s all about.
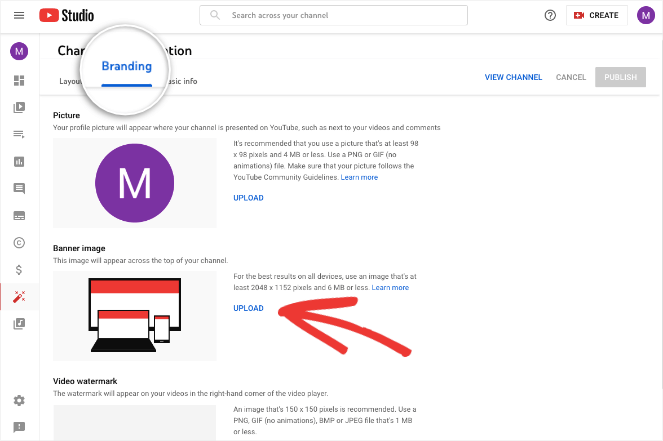
In the descriptions here, you’ll see the recommended image dimensions and file size so that the images display well on all devices. For the banner, the recommended image size is 2048×1152 pixels with a file size of 6MB or less.
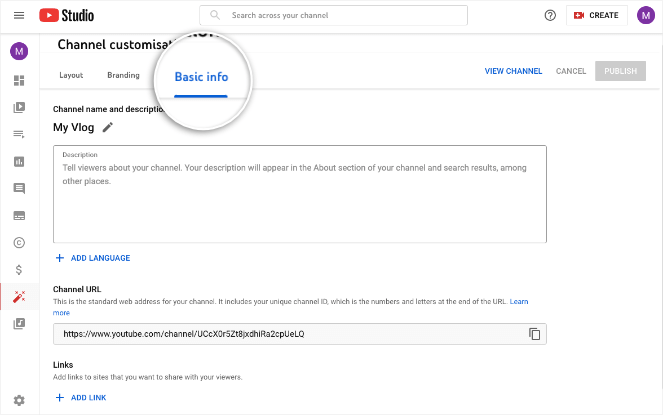
Under Basic Info, you can customize the channel name and description. You can also add languages to cater to a localized audience.
Now if you aren’t sure how to get the right image, see our guide: Where to Find Free Images for Your Blog (15 Best Sites).
You could even use Canva – a free platform to design graphics. They have ready-to-go YouTube templates for banners, profile icons, thumbnails, and more, that are optimized to look good on all screen sizes.
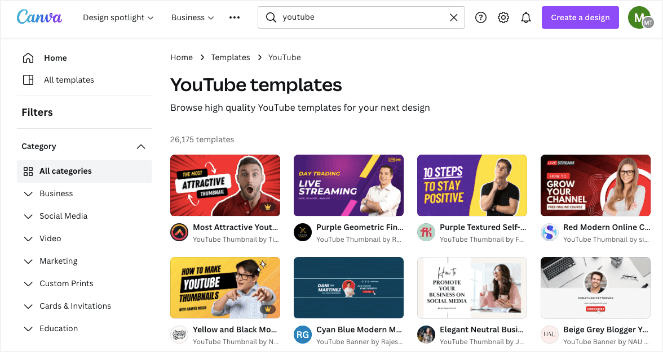
You can pick the best one, simply change the name, and upload it to YouTube.
Step 3: Upload Your First Video
The next step is to start adding content to your channel. In your YouTube account, click on create video icon at the top right-hand corner of the screen.

From the dropdown menu, you can choose to upload a video to your channel. Then select the video from your computer or mobile and upload it.
Now for every video you upload, Youtube gives you complete control over the settings of each one.
First, you can add a title and description, and choose the thumbnail. It’s worth noting here that when you upload subsequent videos, there’s an easy option to reuse the data you’ve already entered for previous videos.
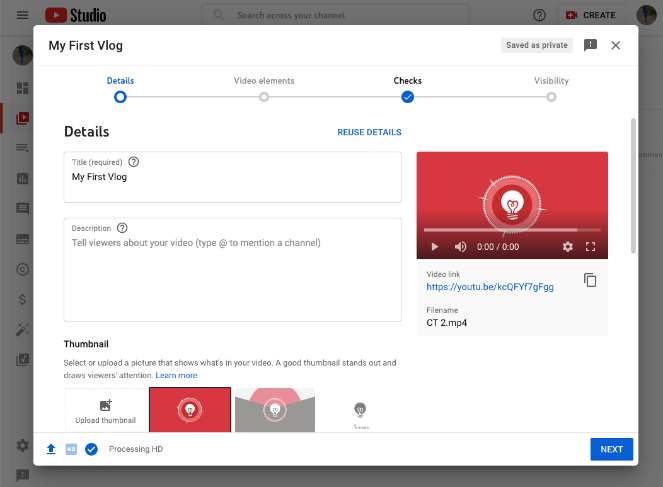
Below this, you’ll see more advanced settings. This lets you indicate whether your content is made for kids or not. You can control how chapters are added to your videos and even how comments work on your videos.
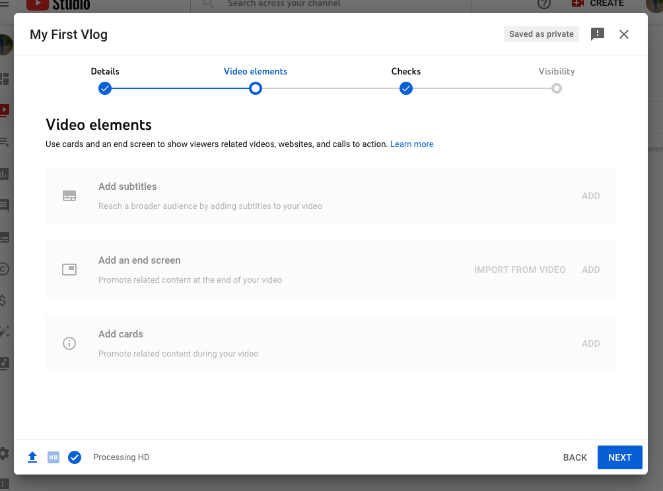
When you click on the ‘Next’ button, you’ll be taken to the next tab ‘Video Elements’. Here you can add subtitles, an end screen, related content cards, and so on.
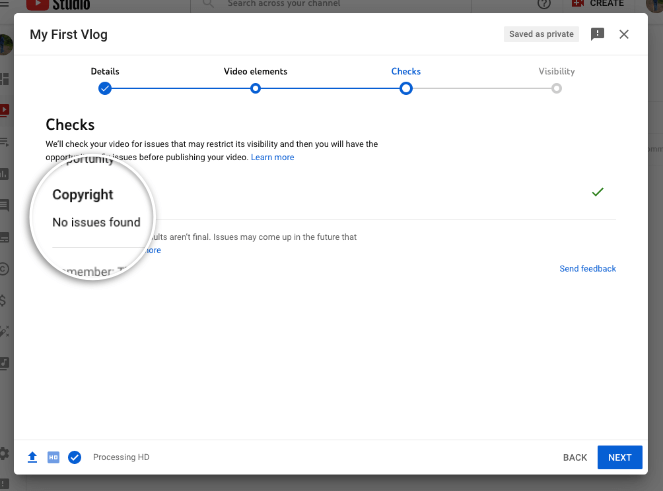
In the next step, YouTube will check for copyright issues and give you the chance to fix them before you publish your video.
Finally, you can choose to save, publish, or schedule your video.
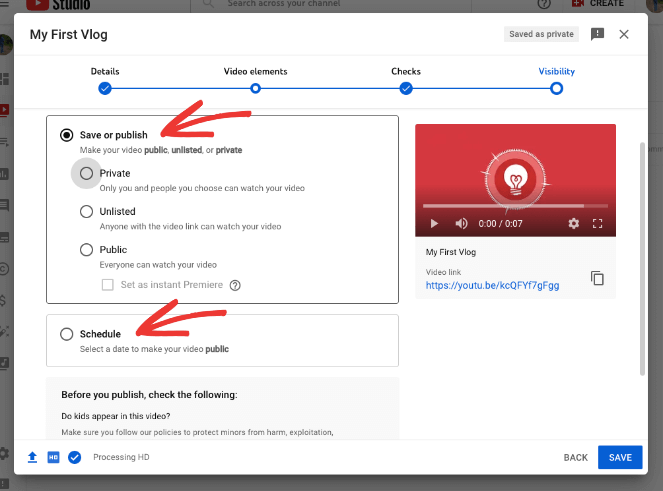
In case you have children present in your videos, YouTube gives you easy access to their policies on minors here. Be sure to read the guidelines carefully.
That’s it. Once you publish your video, you’ll see it appear in your list of all videos you’ve created. This gives you an easy overview of the views, comments, and likes on your videos.
Now you’ve successfully created your own YouTube channel and published your first video. Next, we’ll show you how to make the most out of your blog and YouTube channel by linking the two platforms.
How to Link your Blog to YouTube Channel
There are many ways you can sync your blog and YouTube channel so that you get more traffic to your blog as well as more subscribers to your channel.
Here are the top 2 methods we’ll cover:
- Display a YouTube Feed
- Add a YouTube Subscribe Bar
Display a YouTube Feed
A YouTube feed will display videos from your channel on your blog. Visitors who come to your blog can see that you have a presence on YouTube. They can also click on the videos to watch them or be redirected to your YouTube channel.
You only need to set the feed up once and it will run automatically.
To do this, you need to use a plugin called Feeds for YouTube by Smash Balloon. It’s easy to install and offers a lot of customization options for your feed.
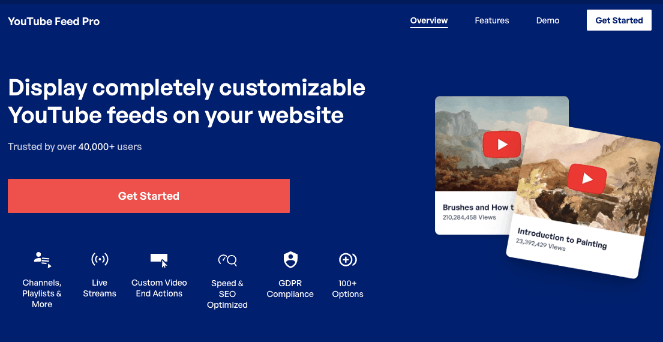
Feeds for YouTube Pro is hands down the best YouTube plugin for your site. It lets you display your YouTube videos in different layouts so that it looks good on your site.
You can choose to add multiple YouTube feeds on your site, either on the same page or throughout your site. You can also combine multiple feeds from different YouTube channels into one single feed.
With the live streaming feature, you can automatically display a feed of upcoming and current live streams from your YouTube channel as well.
Here are more highlights of this plugin:
- Display channels, playlists, and single videos
- Embed the feed with widgets or shortcode
- Stream live videos on your blog
- Filter the videos you want to showcase
- Control what data is shown with every video
- Add custom actions at the end of videos
- Be compliant with GDPR
- Keep your site’s speed blazing fast
What we love about this plugin is that it auto-refreshes the feed. So when you post new videos to YouTube, you don’t have to come to your blog to update it. It will automatically refresh on its own.
The plugin offers endless customization options, powerful social media marketing features, SEO features, and super-fast performance.
Ready to get started? Sign up for Feeds for YouTube Pro.
The plugin is incredibly easy to use so we won’t go into detail here about installing it. But in case you want more help with this, we’ve created a guide with step-by-step instructions on how to set this up: How to Embed a YouTube Playlist on Your WordPress Blog.
Add a Subscribe Button
YouTube lets you add a Subscribe button to any page but you need to add code to a Javascript file on your site. Now if you aren’t familiar with all this, you’ll want to skip it and use a plugin.
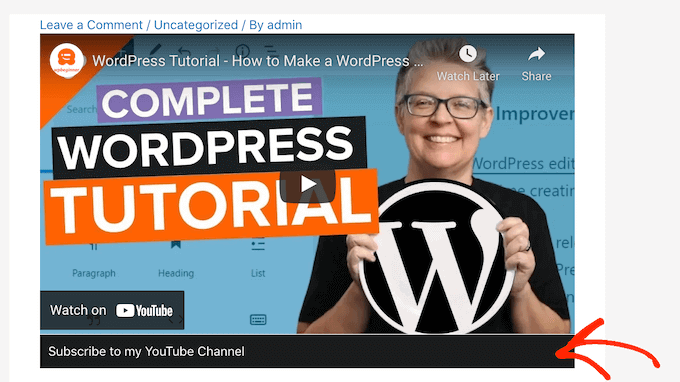
YouTube Subscribe Bar automatically adds a button that reads ‘Subscribe to YouTube Channel’ under every video you post to your website.
It also fetches your YouTube subscriber count to add social proof and encourage more users to subscribe to your channel.
You just need to install the plugin and add your channel ID. Everything else is taken care of.
It’s a really simple plugin to use and it’s free! Once you add it to your site, you can direct blog readers to subscribe to your YouTube channel too.
Tips To Make Your Channel Successful
To be successful on YouTube, you need to be authentic. Make sure you’re creating something that your audience will look forward to.
Here are the top tips you can follow when you’re managing a YouTube channel:
Create Quality Content
Google is focused on helpful content now more than ever. You need to be creating helpful and engaging content for your blog and YouTube channel.
This doesn’t necessarily mean you need to invest heavily in production and editing. But be mindful about your video quality and what content you’re actually putting out there.
Keyword Research
Researching target keywords is important in blogging as well as on YouTube. Find keywords that your target audience is looking for and create content based around that.
You can find ideas using auto-suggestions that appear in the YouTube search bar. This dropdown shows results based on demand.
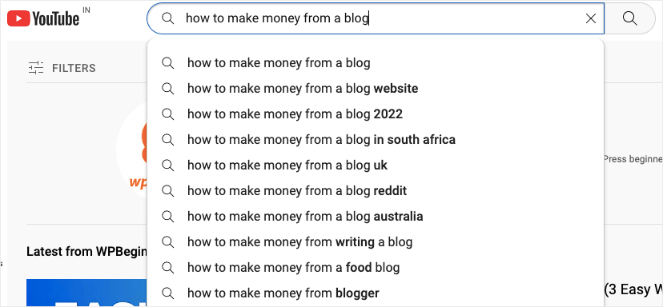
You can even check out related videos to see what’s popular.
Comments Make it Engaging
There are times when you may want to turn off comments, especially if your content is controversial. Other than that, you want to encourage people to comment on your videos.
This gives them an easy way to interact with you and other viewers. It also makes them feel like their part of your channel.
Encourage Users to Subscribe
Users may subscribe on their own when they want to see more of your content. But you need to nudge people to subscribe if you really want to grow your list.
This is simply because people are more likely to subscribe if you ask them to.
Be Consistent
If you’ve been blogging for a while, you’ll know that you need to publish content regularly if you want to establish your authority and stay in the top ranks. The same goes for your YouTube channel.
You need to dedicate time consistently to publish quality videos to your channel on a regular basis if you want to gain a loyal fan base and grow your brand.
To do this, you’ll want to plan out your content calendar ahead of time and schedule videos to publish automatically.
That’s all we have for you. We hope you found this guide on starting a YouTube channel helpful. You’ll also want to see how easy it is to leverage a Twitter audience as well. Check out our guides: How to Add ‘Click to Tweet’ Boxes in WordPress (3 Easy Steps) and How to Embed Tweets in WordPress (Easy Guide).
And don’t forget to sign up to our email newsletter so you can get useful content like this sent right to your inbox!


0 Comments
Join in. The comments are closed after 30 days.