
D o you want to get more reads for new blog posts? You can send out push notifications to your user's browser every time you publish a new post. This will help you stay in touch with readers and keep them coming back for more. And the best part is it will run automatically which means less admin work for you.
In this step-by-step guide, we’ll show you how to notify subscribers of new blog posts on your WordPress site.
3 Ways to Notify Subscribers of New WordPress Posts
You can use different channels to let your users know when a new blog post has just been published on your site. Our top 3 include:
- Push notifications: Readers can subscribe to these notifications without entering their personal information. Then you can send notifications to them that will appear in their browser even if they aren’t on your website.
- Email: You can use an email automation tool to send out an email to your subscribers to let them know a new post is available on your blog. You can add custom email subject lines and email content to better engage your audience.
- RSS feed: This lets users add your website to their RSS feed and stay up to date on the latest news, posts, and more. Learn how to add an RSS feed to your site: How to use RSS in WordPress?
In this guide, we’ll focus on the #1 way to send out new post alerts and that’s push notifications. It’s the easiest one to set up and it’s so simple for readers to subscribe, they’ll love it.
How to Send Push Notifications For New Blog Posts
Push notifications are easy to set up, automated, and easy to manage using a tool called Push Engage. It’s proven to drive results with higher open and click-through rates.
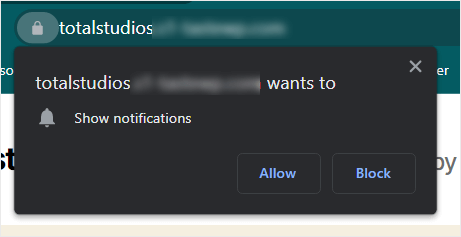
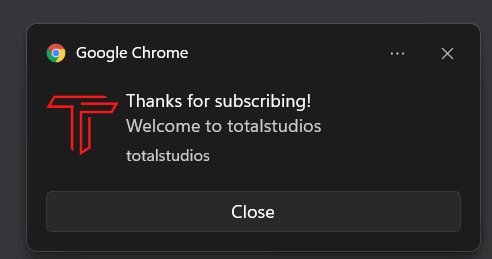
PushEngage is hands down the best push notification plugin for WordPress. It’s powerful yet simple. Your readers will love it because they can subscribe without sharing their email addresses. All they have to do is click ‘Allow’ in the popup that appears in their browser. Then they’ll get an automated welcome message like so:

You’ll love PushEngage for the following reasons:
- Send notifications at the best time of day according to local timezones
- Notify users about new posts, products, sales, price drops, and more
- Seamleslly integrate with WordPress
- Set up automated signup and welcome messages
- Create automated drip and trigger campaigns
- Segment and target your audience
- Access analytics to see views and interactions
Added to this, PushEngage has a free plan so you can sign up without spending a dime.
There are just so many reasons why push notifications are the best way to notify users about new blog posts. Want to know more about this tool? See our full review: PushEngage Review.
The guide below will help you set up push notifications using PushEngage for any website including blogs, eCommerce stores, and business websites.
Step 1: Sign up for PushEngage
To get started, you need to create a PushEngage account. If you’re just starting out, you can sign up for the free plan. This lets you create 30 campaigns and send notifications to up to 200 subscribers. For unlimited campaigns and more advanced features, you can sign up for a paid plan that starts at just $9 per month.
When you log into your PushEngage account, first, you need to set up your website. You can do this under Site Settings » Site Details in the left menu. On this page, you can add your site name, URL, and add a site icon.
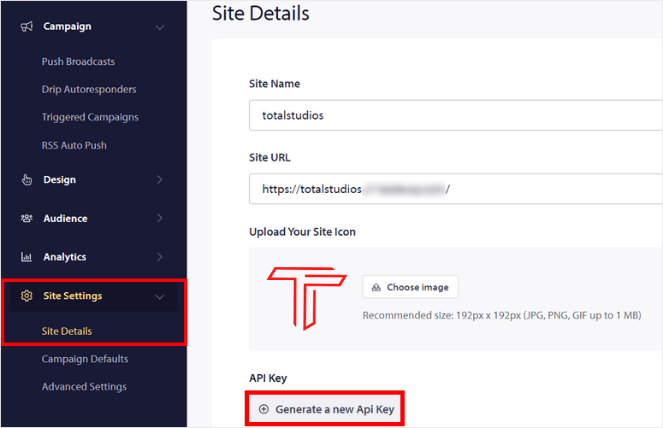
Next, to connect PushEngage to your website, you need an API key. This is so easy. All you have to do is click on the Generate a new Api Key button on the same page.
Now, you’ll see a new key appear on the screen. Copy it and keep it ready for the next step.
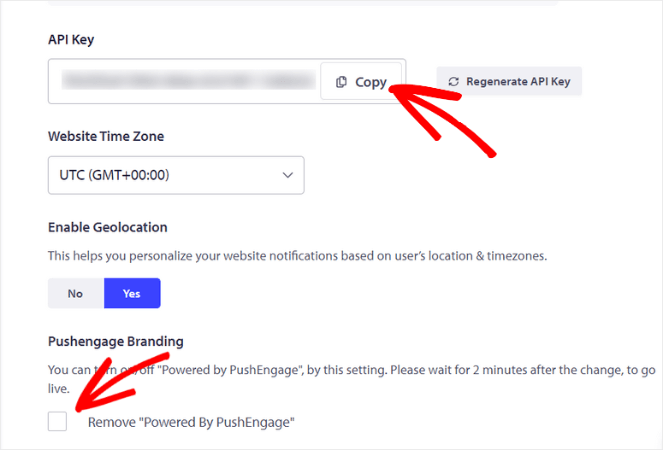
Below the API key, you’ll see an option to select your website’s time zone. You can also enable the Geolocation feature. This lets you send push notifications to subscribers based on their geographic location. That way they’ll be notified based on their timezone and when they’re most likely to be online.
If you have a premium plan, you can remove PushEngage branding from your notifications.
Now you need to install PushEngage on WordPress to sync your account with your website.
Step 2: Install PushEngage on Your WordPress Site
PushEngage has a free WordPress connector plugin that you can install on your site.
Log into your WordPress admin and navigate to Plugins » Add New page. Here, search for PushEngage and click on the Install Now button.
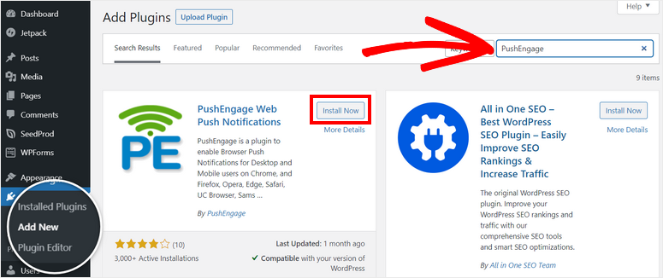
When you activate the plugin, you’ll see PushEngage appear in the admin menu on the left. Inside, head over to the Setup tab and paste the API key here.
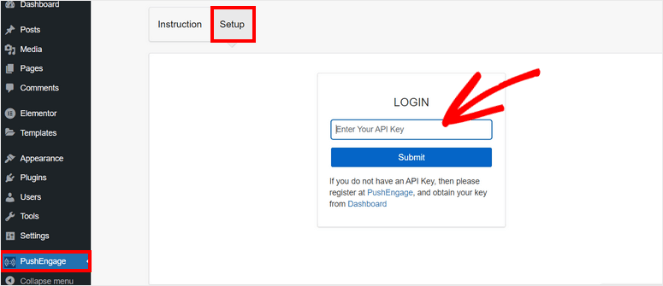
Once you submit the key, you’ll be able to see all the plugin settings:
- General Settings
- Subscription Dialogbox
- Welcome Notifications
- Automatic Segmentation
Under General Settings, there are options to edit and update your site details.
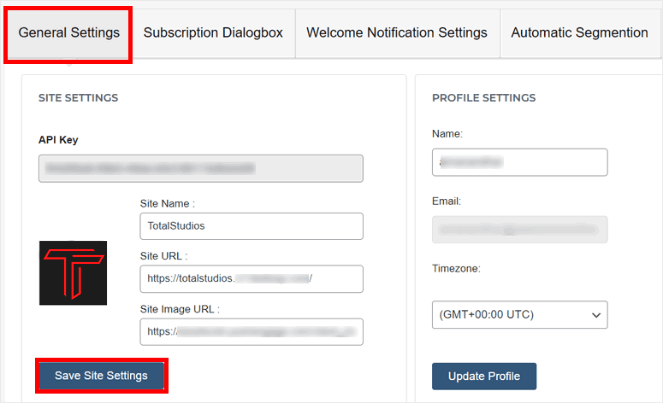
Further down the page, you’ll get an option to set up automated push notifications for WordPress posts. This includes:
- Trigger a notification for all types of posts
- Add the featured image of the post
- Disable subscription popup on page load
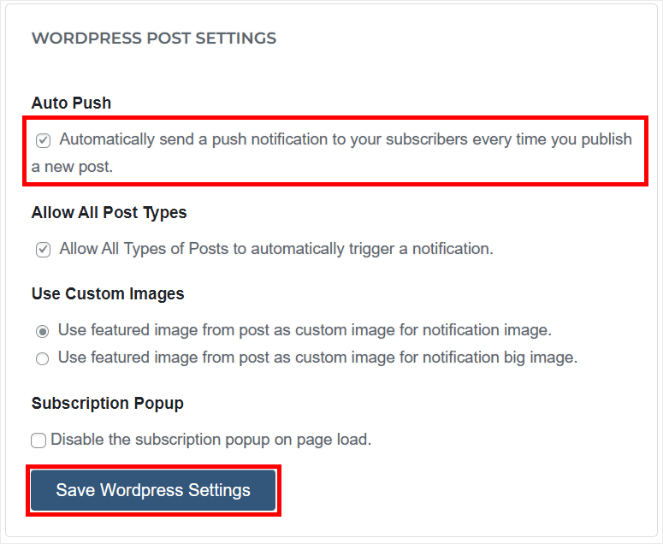
After you configure your settings, be sure to save your changes.
Step 3: Set Up Subscription Dialogbox
The subscription dialogbox is a popup that appears on your site asking people to allow browser notifications.
In your PushEngage dashboard, go to the Subscription Dialogbox tab and choose the layout for the popup.
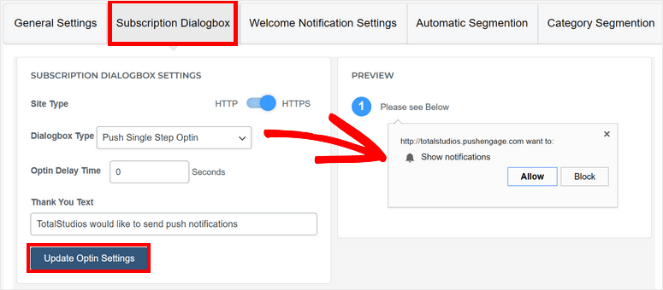
You can pick from a list of styles including a safari-style box, bottom-placed bar, and push single-step optin. PushEngage lets you see the preview on the right-hand side to make sure you pick the right one.
When you’ve finished customizing the layout, save your changes using the Update Optin Settings button. Now your signup popup is ready.
When visitors come to your site, they’ll see a popup prompting them to subscribe to your notifications. It would look something like this:
Next, we’ll show you how to set up a welcome message for readers that subscribe.
Step 4: Customize Welcome Notification
When someone subscribes, you can send them a welcome message as their first push notification. There’s already a default welcome message set up inside PushEngage.
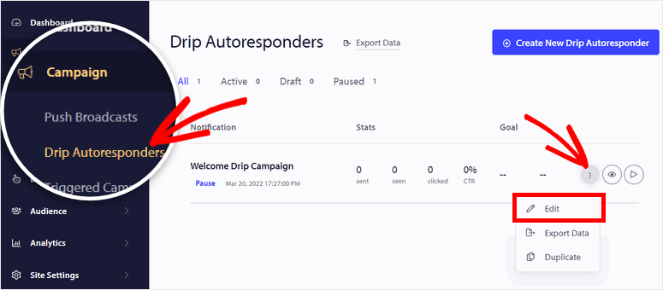
You can customize this under the Campaign » Drip Autoresponders page from the left menu. You’ll see the Welcome Drip Campaign. To edit this notification, select the three dots and click on the Edit button from the dropdown menu.
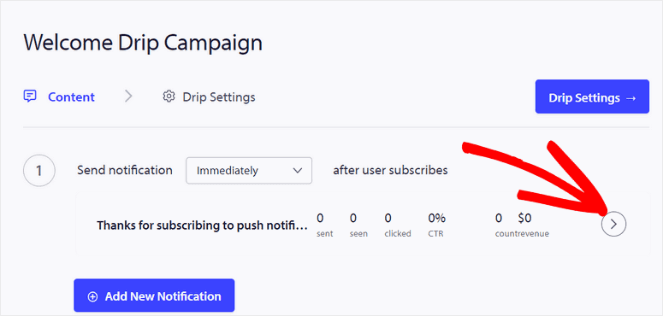
Here, you can choose when the notification is sent. To change the text, click on the arrow on the right-hand side of the page.
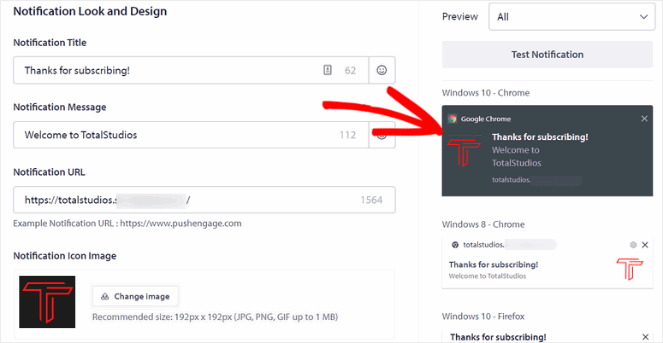
Now you can customize the notification title, message, URL, and icon image. You can see a preview on the right so that you know how the notification will appear to users.
Once you’re done, you can send a test notification to make sure it’s working correctly. Then all you need to do is activate this welcome autoresponder for all your subscribers. Here’s a sample of what a welcome message might look like:
Now everything is set up and you’re ready to go. There’s just one more setting we need to show you.
Step 5: Enable/Disable Notifications for Individual Posts
PushEngage gives you full control over which posts you want to notify subscribers about. When you create a new post in WordPress, in the post edit screen, there’s a taskbar on the right.
Here, you’ll see a checkbox to enable push notifications for this post.
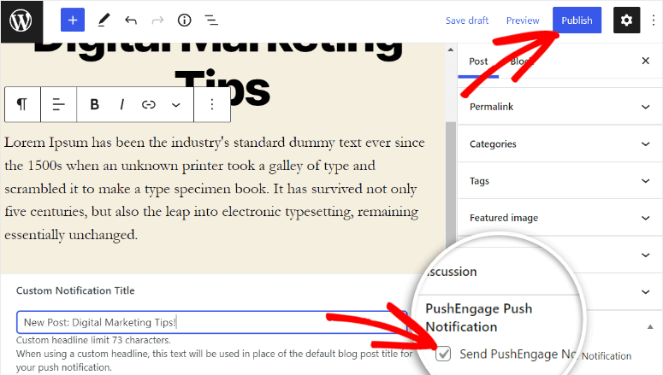
By default, the blog post title will be the notification title. But you can change that if you want by entering custom title and text.
If you don’t want to notify readers about this particular post, then you can uncheck the box here.
That’s it! Your website will now send out a notification to subscribers every time you publish a new blog post.
If you want to set up email notifications as well, we’ve covered all the details in this guide: How to Create an Email Newsletter. You’ll also want to read How to Use ‘Yes or No’ Email Popups to get people to sign up for your newsletter.
And don’t forget to sign up for our email newsletter so you can get helpful content like this sent right to your inbox!


Great! It is a useful informative blog. WordPress push notification is so important to re-engagement with subscribers and it’s generally a type of tool which helps to increase your business growth.